


How to use a power plunger?
How to use a power plunger? |
||||
A step by step guide to using a power plunger |
||||
 |
Step 1 – Seal off over flowsSeal off any over flows. A damp towel or cloth can be used, or an alternative method would be to use a piece of tape (strong adhesive tape is best e.g. duct tape). |
|||
 |
Step 2 – Remove plugsRemove any plugs or drain covers. |
|||
 |
Step 3 – Choose washer sizeChoose the correctly-sized cup washer for the job. |
|||
 |
Step 4 – Fit washerFit the washer to the nozzle-end of the power plunger. If the washer does not fit with ease, try applying a small amount of lubricant (e.g. silicone spray) onto the end of the nozzle. |
|||
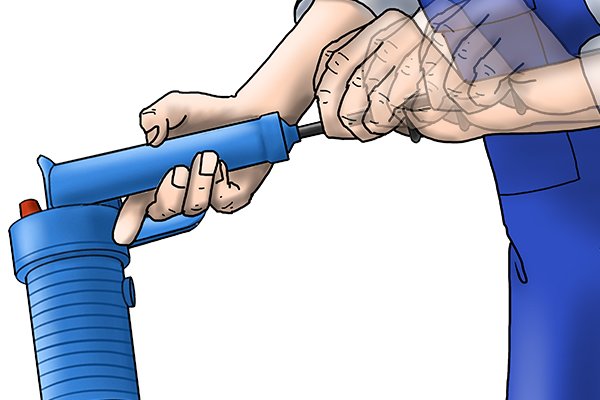 |
Step 5 – Pump handleThe plunger will need to be made airtight (to stop air escaping). This is done by pumping the handle several times in quick succession. |
|||
 |
||||
 |
Step 6 – Pump againThe power plunger will then need to be pumped a further three to four times to generate sufficient air pressure in the cylinder (for delicate pipework, less pressure may be needed, so give fewer pumps). |
|||
 |
||||
 |
Step 7 – Position cup washerPlace the cup washer in the drain hole. |
|||
 |
Step 8 – Push down firmly on drainEnsure the drain is completely covered by the cup washer, and push down firmly on the drain (not too firmly if the sink is not supported by a pedestal). |
|||
 |
Step 9 – Pull triggerPull the trigger back quickly, to release all of the built-up air pressure in one pull. |
|||
 |
Step 10 – Check flow of waterPour water into the sink and watch to see if it flows away down the drain (this indicates that the blockage is freed). If there is still a blockage present, repeat the steps 1-8. |
|||
How do you use a power plunger in a toilet? |
||||
 |
To use a power plunger to unblock a toilet, the process is the same. The only differences are that the toilet will still have water in the bottom of the gulley and there are no over flows that need to be blocked off. | |||
