Our other sites:

What is cross filing?

What is cross filing?

Cross filing, also known as straightforward filing, is the most commonly used filing technique and can be executed with any type of file.


It is also the most commonly misused filing technique!

Step by Step Guide to Cross Filing

DIYers tend to be keen to use their files to rub down a surface without any thought about the proper use of their tool, which can result in sloppy workmanship and damage to the file.


Cross filing is so commonly used that it could be considered ‘normal’ filing. Examples of tasks that require cross filing include deburring the edge of a piece of metal, removing scale from pipes and sharpening a chainsaw.

Step 1 - Prepare Workpiece

Correct position for draw filing material

Clamp the object you are going to be filing into a vice so that it is secure and doesn’t wobble around. Don’t forget to use a filing block.


If you have a lot of material to remove from your workpiece, you will find it easiest to have it set just below elbow height. This allows you to use a little more weight from your upper body to assist you in removing material. 

If you’re working on fine details then setting it at eye level will prevent you from having to bend. 


Otherwise, you should find that you will be most comfortable with your workpiece set at elbow height.

Step 2 - Grip File Securely with Both Hands

Hold the file in your dominant hand, with your thumb pointing along the top of the handle of the file. Your non-dominant hand should grip the point of the file.


If the point of the file is rough enough that it digs into your hand, you can use a glove or drill a hole in a piece of wood and fit it over the point of the file in order to protect it.

Step 3 - Sharpening

Taking care to keep the file level and at 90° to the workpiece, apply light pressure to the file and push forward from point to heel.


You should use the full length of the file on each stroke.


Incorrect way to draw file a piece of material

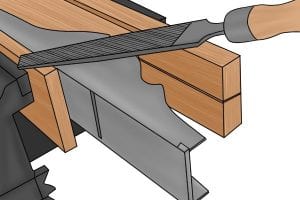
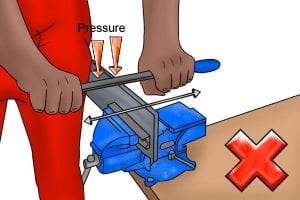
Make sure the pressure you apply is light. If you put too much weight on the file, you can cause it to become clogged with the material, break some of the teeth (sometimes called ‘shelling’) or cause the file to create harmful vibrations in the material (referred to as ‘chattering’).


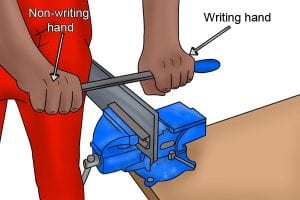
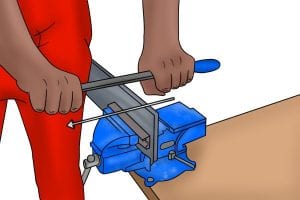
You should also use your non-dominant hand to guide the file to the right as you make a stroke. The trick is to still keep the file at right angles to the workpiece as you do so!

Step 4 - Draw Stroke

Once you have completed a full push stroke, lift the file off the workpiece and return to your start position. 


Pulling backwards on a file and applying pressure can also damage the file’s teeth.

This is because the teeth are angled towards the file’s point. Teeth can become dull or broken if they are dragged backwards along the workpiece.


Step 5 - Repeat Process

Repeat the cross filing process until material is filed

You can repeat this technique until you have filed your workpiece to the shape you desire, finished deburring, or have a smooth or sharp surface, depending on what you were aiming for.

Wonkee Donkee Tools
Logo