


How to use a digging bar to dig a post hole?
How to dig a post hole |
||||
|
|
||||
Which design is best? |
||||
 |
When digging a hole for a post, you will want to be able to tamp dirt or cement down with ease.
For this task, it’s best to use a post-hole digging bar, which has a tamper head built into its design, and is narrow and long enough to fit into your hole alongside your post. |
|||
What else will you need? |
||||
 |
A fence post | |||
 |
A spirit level | |||
 |
A tape measure | |||
 |
A post-hole digger | |||
 |
Some hardcore or gravel | |||
 |
Post-mix cement (optional) | |||
 |
Two timber battens | |||
Wonkee’s hoof-by-hoof guide: How to dig a post hole |
||||
| As with any task involving digging, Wonkee Donkee recommends you first: | ||||
 |
Step 1 – Check area safetyCheck for the location of any electrical wires and sewage or water piping. |
|||
 |
Step 2 – Select digging areaMake note of their location, and select a safe and appropriate spot to dig. |
|||
 |
Step 3 – Mark digging areaMark on the ground the spot you want to dig – in this case, your digging area is likely to be too small for a rope outline to be appropriate, but DONKEE recommends you at least mark the spot at which you want to start digging. You can now start digging! |
|||
 |
Step 4 – Outline holeWith the chisel edge of your post hole digging bar, outline a hole of the appropriate width for your post. As a guide, most post holes are roughly 300mm round. |
|||
 |
Step 5 – Digging to correct depthThe depth of your hole depends on the height of your post – as a rule of thumb, a quarter of your post’s height should be buried, and the remaining three quarters above ground. |
|||
 |
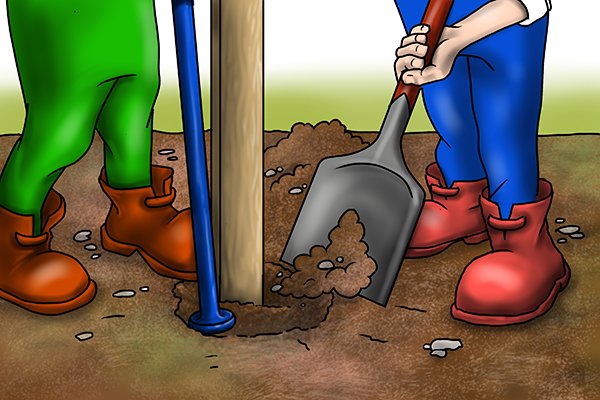
Step 6 – Remove debrisAs you are digging, you can remove loose dirt from the hole by gripping it with the jaws of your post-hole digger and lifting it out. Keep displaced soil close to the hole, as you will need this later. |
|||
 |
Step 7 – Tamp base of holeWhen you have dug your hole to the required depth, tamp the base level with your bar’s tamper head. |
|||
 |
Step 8 – Fill base of holeFill the base of your hole with about an inch of hard core or gravel (it doesn’t matter which). This will aid soil drainage and reduce the risk of dry rot at the foot of the post. |
|||
 |
Step 9 – Insert postPlant the post in the hole. |
|||
 |
Step 10 – Options for securing postUsing a spirit level to keep your post level, you can now either: |
|||
 |
a – Pack base with dirtPack the dirt you removed earlier back around the base of the post, using the tamper head of your bar to compact it tightly. – This is quicker, but may result in dry-rot later on, as wood can weaken when exposed to soil. |
|||
 |
or, b – Secure base using cementGradually fill the hole around the base of your post with dry post-fix cement. – This will protect your post from dry rot, but is more expensive and time-consuming. |
|||
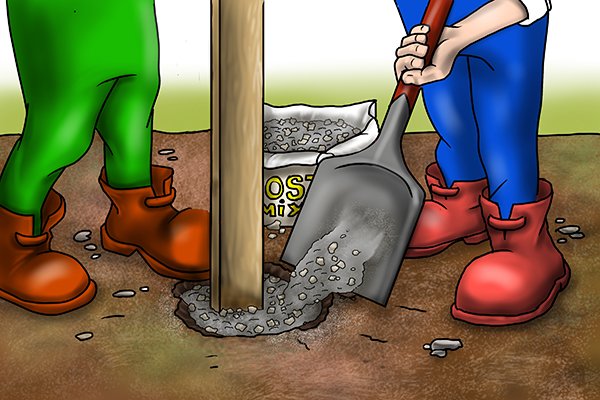 |
Step 11 – Fill holeIf you followed step ‘b’, fill the hole to about an inch from the top with cement. |
|||
 |
Step 12 – Tamp down cementUsing the tamper head of your bar, tamp down the cement, using your spirit level regularly to ensure that your post is level. |
|||
 |
Step 13 – Wet cementPour water over the cement around the base of your post. |
|||
 |
Step 14 – Secure post using battensScrew two supporting battens to the base of your post, continuing to check regularly with your spirit level that the post is level – these will keep your post upright and in position until the cement has set. |
|||
 |
Step 15 – Finish installationWhen the cement base has set, you can remove the supporting battens and cover over the unfilled inch at the top of the cement with soil or turf, improving the look of your post. Congratulations! Your installation is now finished. |
|||
