Our other sites:

How does a feeler gauge work?

How do you use a feeler gauge?

Feeler gauges are hand-held measuring tools widely used to precisely measure the size of small gaps or spaces between two objects. A feeler gauge consists of a range of different folding metal strips of different thicknesses.

Step 1 – Unfold Feeler Gauge Blades

To use a feeler gauge, unfold the different size measuring blades from the case.

Step 2 – Select Leaf

Select an individual leaf that looks approximately the same width as the gap you wish the feeler gauge to measure.

Step 3 – Fold Away Other Leaves

All feeler gauge leaves can be used individually. Those not in use should be folded away so they do not become bent when measuring.

Step 4 – Insert Feeler Gauge in to the Gap

Hold the feeler gauge the same way you would hold a pen knife or a multi-tool, between your thumb and forefinger.


If needed, feeler gauge blades can be stacked together to obtain the correct size for measuring.


For example, a gap can be measured using more than one leaf at a time for extra precision. A small leaf of 0.05mm (0.002 inch) can be added to any of the larger blades.

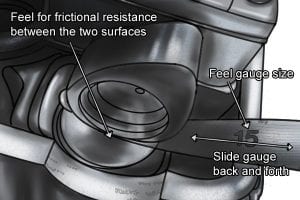
As leaves increase in size, their measuring increments correspondingly become further apart. Adding smaller leaves therefore helps with precision between the larger set values.


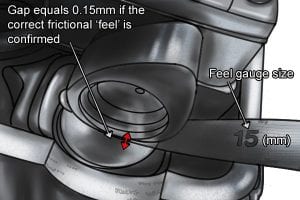
Another example is adding leaves 0.05mm (0.002 inch) to 0.90mm (0.036 inch) allows the in-between value of 0.95mm (0.038″) to be accurately measured. In this case, the width of the gap will equal the sum of all the gauge leaf measurements inserted.


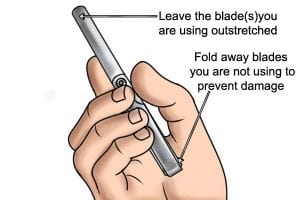
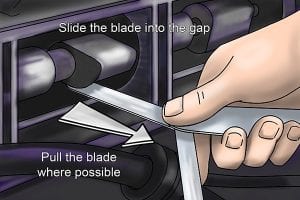
Always remember when using the feeler gauge as a measuring tool to fold away any blades that are not in use to avoid accidental damage.

Step 5 – Be Gentle

Be sure to apply minimal force when sliding the feeler gauge into a gap. You are looking for a natural fit.


Be aware that the feeler gauge blades vary in thickness and that thinner blades are particularly prone to bending if force is applied to the blade when it is pushed into a gap.


Feel for correct frictional resistance as you slide the feeler gauge blade between the two surfaces.

Step 6 – Feel for Frictional Resistance

Whilst sliding the blade through the gap, see if you ‘feel’ sufficient frictional resistance. 


A comparison to help understand the resistance you are looking for is the likening to removing a sheet of paper from underneath a magazine when using a feeler gauge as a measuring tool. Another comparison is the level of resistance felt when pulling sellotape off a roll. 

Do not force the feeler gauge into the gap. You may damage the blade of the feeler gauge or worse, the item you are measuring. The feeler gauge may also get stuck in the gap you are trying to measure.


Always start with a slightly thinner gauge blade when measuring a space.


If the gap is larger than the blade, and there is little or no resistance, change to a thicker gauge or progressively add additional blades until the resistance feel is correct.

Step 7 – Check Gauge for Measurement

If there is sufficient friction then you have found the gap measurement.


Read off the gauge size, or total up the blades if you have used more than one, to obtain the actual gap dimension.

Wonkee Donkee Tools
Logo