Our other sites:

How To Use A DeWalt Bench Grinder?

How to use a DeWalt Bench Grinder?

DeWalt Bench Grinder and accompanying accessories.

DeWalt Bench Grinders are a great power tool to have in your workshop whether you are a professional or DIY’er. But, before you get started, make sure you read our full guide on how to use a DeWalt Bench Grinder!

Before You Start!

Keeping your workspace clear of clutter before you start projects.

Tidy away any clutter from around the grinder to reduce the risk of flying debris.


Check that the tool rest is in the right position. This may vary slightly according to the task at hand, but as a general rule it should be at the same height as the centre of the wheel, and as close to it as possible.


Get a container of cold water ready so you can cool down your tools if they become too hot.

Caution signs warn others of danger.

Protect yourself from showers of sparks by wearing a full face visor or safety glasses, long trousers and sturdy shoes. Ear defenders are also advisable, as well as a face mask to keep out dust.


The experts at DeWalt advise against wearing gloves – if one gets caught in the wheel, it could pull your hand with it.

New wheels should be hammered to check for cracks.

Before fitting a new wheel, you need to check it for hidden cracks by suspending it on a thin cord and tapping it lightly with a hammer. The wheel should give out a clear ringing sound – if it doesn’t, this shows it is damaged and must not be used.


Switch on the machine and let the wheel spin with no load for at least half a minute before use. Stand to the side until the grinder reaches maximum speed – if the wheel is flawed, this is the most likely time for it to come apart.

Key Tips When Grinding

Keep Moving

Bench grinder used by sliding the material side to side.

Make sure you keep moving the workpiece across the width of the grinding wheel. If you hold the tool still in one spot, it will quickly heat up and lose its hardness. You will also wear a groove down one part of the wheel if you don’t use the whole surface.

Lighten Up

Be light when using a bench grinder.

Don’t be heavy-handed or the tool might dig into the wheel and cause damage. Just apply a steady light pressure, and you’ll find it easier to grind the surface (or edge) of the tool you’re working on at an even rate all the way across.

Keep Your Cool

Cooling material down during use.

Grinding produces a lot of heat. If your metal tool starts turning blue it has become too hot and will lose its temper (hardness).


Keep a jar or bucket of water next to the grinder and dip the tool in as often as is required to cool it down.

Stay On Target

Keep your hand steady when using a bench grinder.

Don’t hold the workpiece against the side of the wheel – this may cause it to shatter. Stick to the main face of the grinder, holding the tool at the same angle as the existing bevel.


As the grinding wheel wears down, the gap between it and the tool rest will increase, so remember to adjust the position of the rest periodically.

Using the DeWalt Grinding Wheel

DeWalt grinding wheel to sand down material.

Place your blade on the tool rest, holding it tightly with both hands. Carefully push the blade on to the grinding wheel, keeping it angled slightly upwards to create a sharp edge.


Move the tool back and forth, brushing it constantly across the wheel to prevent it from cutting into the blade or heating it up too much.

Using the DeWalt Honing Belt

Prepare Belt

Labelled diagram for preparing a sanding belt for use.

Make sure the belt is properly centred by turning the centring knob, then adjust it to suit the shape of the workpiece. You do this by slackening the honing support knob so you can set the backing plate to the right spot – up, flush or down – to change the height of the belt. Tighten the knob back up to secure the backing plate in place.


Finally, ‘dress’ the belt by spreading a thin, even layer of honing paste over its entire outer surface. Make sure the leather side is facing outwards.

Get To Work

Labelled diagram of a linishing belt.

Hold the cutting edge of the tool in the direction of rotation as shown by the arrow on the side of the grinder, then move it back and forth over the belt.


You can grind at three different points on the belt:


The area marked ‘A’ over the large belt pulley or the area ‘B’ over the backing plate for initial rough grinding;


The unsupported areas marked ‘C’ for finishing – the belt will mould itself to the shape of the workpiece.

Looking after your DeWalt Bench Grinder

Grinding wheel dressers are used to smoothen the belt surface.

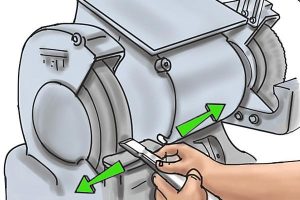
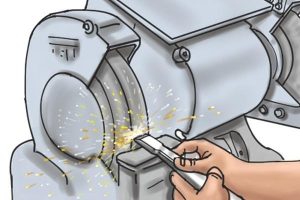
To keep your wheel working effectively, treat it regularly with a wheel dresser. This will sharpen the wheel by removing glaze to expose new grains, providing a fresh cutting surface.


It will also smooth out irregularities and flatten the surface of the wheel to make it completely straight and level again.


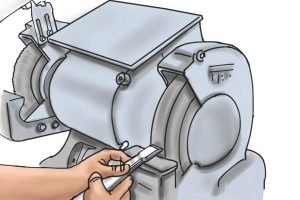
Remember to adjust the tool rest afterwards, so the gap between it and the wheel doesn’t get big enough to trap your finger or the tip of a workpiece.

Dust protection saves the motor from dust and debris.

Bench grinders don’t need much maintenance, but you should remove grindings from the housing and covers of the machine on a weekly basis to reduce the chance of debris becoming lodged in the mechanism.


Keep the ventilation slots clear at all times. If dust accumulates, blow it out with jets of dry air. Wipe the housing down regularly with a soft cloth.

Cleaning power tools ensures that tools remain in prime condition.

Don’t let any kind of liquid get inside the machine, and don’t use solvents to clean non-metallic parts as the chemicals may weaken the materials. Instead, get rid of dirt by using a damp cloth with mild soap.

Keep your linishing belt in a cool and dry place to prevent stretching.

If your bench grinder is the linishing/grinding type and know you’re not going to be using it for an extended period of time, remove the leather honing belt and store in a dry place to prevent it stretching.

Wonkee Donkee Tools
Logo