Our other sites:

How To Use A DeWalt Drywall Screwdriver?

How to use a DeWalt Drywall Screwdriver?

Examples of a DeWalt Drywall and Collated Screwdrivers.

At Wonkee Donkee, we believe that before you use any power tools it is vitally important that you read and understand all of the functions and safety advice. Our number one tip is to always be safe when using any power tools and that includes wearing the appropriate personal protective equipment for the task!

Charge the Battery!

DeWalt battery charger used to make sure you charge the power tool battery.

For best results with all powered screwdrivers, charge the batteries up fully before first use.


Plug the charger into a suitable 230V outlet before sliding the battery pack into the base of the tool. A red light will start blinking, showing that charging has begun.


When charging is complete – which will take about 40 minutes for a high capacity 2.0Ah battery pack – the light will remain on continuously.

Press the release switch to remove the battery.

To install the battery pack, line it up with the notch inside the handle of the screwdriver then slide the pack into the handle until you can hear the locking mechanism click into place.


You can remove the pack if required by pressing the release button at the base of the handle then firmly pulling the battery pack out.

Using the DeWalt Drywall Screwdriver

Inserting the Bit

Guide on how to remove a DeWalt drywall screwdrivers nose cone.

Before you start, you need to install the bit. Make sure the tool is switched off, turn the locking collar anti-clockwise to unlock the nose cone from the gear housing, then pull the cone forward to remove it. You can now push the bit into the bit-holder.


Replace the nose cone and secure it by rotating the locking collar until the arrow on the gear case lines up with the lock icon on the collar.

How to change the depth adjustment collar on a DeWalt Drywall Screwdriver.

Set the screw depth locator to the required level by turning the adjustment collar to the right (for a deeper setting) or left (for a shallower setting), being guided by the yellow symbols.

Put the screwdriver in forward rotation mode before you start.

Use the forward / reverse switch, located just above the trigger, to make sure the tool is set to forward rotation mode.


Reverse rotation is used only for removing and backing out screws. If the switch is set to neutral, the motor won’t start.

Be careful not to block the screwdriver's air vents.

Hold the screwdriver firmly at all times, keeping one hand on the rear grip. Always be prepared for kick-back – a sudden jolt – if the driver hits a hidden object.


Whether you’re holding it ‘in-line’ (along the top) or in a pistol-grip position, be careful not to accidentally block the air vents, otherwise the motor is likely to overheat.

DeWalt Drywall Screwdriver being used to drill into the wall.

Set the tool running by pressing the variable speed trigger, then put the screw on the bit.


Push the screw against the surface of the plasterboard to get it going – the screwdriver has a depth-sensitive clutch, so the bit won’t begin to turn until you apply pressure. Keep pressing firmly until the depth locator is touching the plasterboard.


When the pre-set depth has been reached the bit will automatically withdraw from the screw head.

Using the Collated Screw Magazine Attachment

Dewalt drywall collated screwdriver magazine and bit.

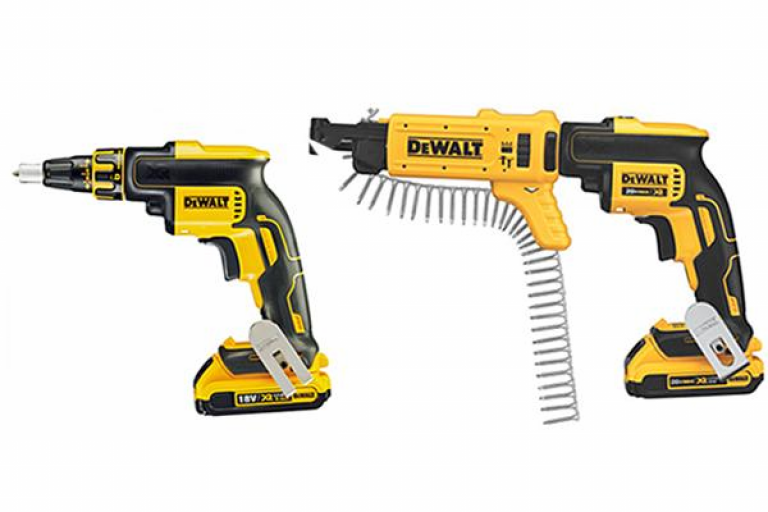
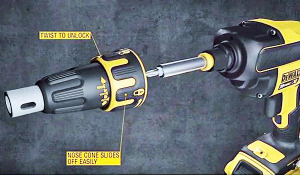
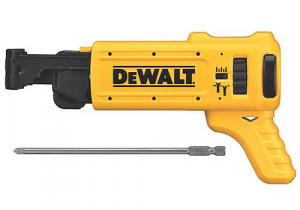
Pull the nose cone off the screwdriver and take out the normal 25mm bit and bit extender. Replace with the extra long extended collated bit supplied with the magazine, pushing it into the bit-holder until you hear a click.


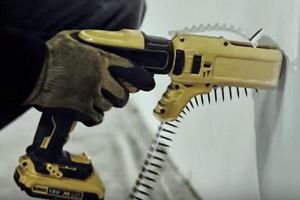
To attach the magazine, simply push it over the bit onto the screwdriver, rotating it if necessary until it clicks into position. To remove it, press the release buttons on both sides of the magazine and pull firmly.

Setting Screw Length

Slots for most screw lengths are marked on the shoe.

It’s important to pre-set the correct screw length, otherwise the screws won’t be driven accurately and the whole sequence could be affected.


For ease of use, specific slots for the most common types of screw are marked on the shoe of the magazine. However, you can use the attachment with any size of screw between 25mm and 57mm (1″ to 2¼”) – simply adjust it to the next longest slot.

Slide the tab to the left to alter the screw length.

To alter the screw length, slide the magazine’s length adjustment tab to the left and hold it down while moving the shoe to the length you require.


Let go of the tab and check that the locking pin has returned to its original position.


A word of warning: never adjust the setting while a screw strip is held in the magazine.

Inserting a Screw Strip

Feed the screw strip into the base of the screw guide.

Before you start, make sure the screwdriver is switched off and the trigger is locked.


Take a (preferably new, undamaged) collated screw strip and, holding it by the plastic part, feed it carefully from the base of the screw guide up into the base of the advancing mechanism. Keep on feeding it through until the first screw is positioned one slot below the bit.

Setting the Screw Depth

You can adjust the screw depth using the slider.

Turn the fine depth adjustment slider anti-clockwise (as seen from behind the tool) to make the head of the screw come to a halt just above the work surface, or clockwise to make it go deeper into the work surface.


A window lets you see whereabouts the tool is within the range of adjustment. The screw head will stop in the highest position when the slider is furthest from the tool, and in the deepest position when the slider is nearest.

Inserting Screws

Place the shoe where you want to insert a screw.

Driving screws into plasterboard is quite straightforward. Make sure the drive direction is set in forward rotation mode before you start, and always hold the screwdriver at right angles to the work surface.


Place the shoe of the magazine on the plasterboard in the spot where you want to insert a screw, then turn on the screwdriver by squeezing the trigger.

How to rotate a DeWalt drywall screwdriver to reach difficult places.

Apply a steady pressure against the plasterboard. This will activate the mechanism to start driving the screw. Keep pressing until the screw has been fully inserted into the workpiece and the clutch has automatically disengaged.


You can easily rotate the magazine if necessary to reach awkward corners. Just grip the top part with one hand while holding the screwdriver with the other, then twist. You’ll hear a click when the magazine engages in each of the possible positions.

Detaching the Advancing Mechanism

Push on the shoe while you depress the removal button.

You’ll need to remove the advancing mechanism occasionally so you can clean the magazine and avoid the built-up of dirt and debris.


Having taken the magazine attachment off the driver, lightly press down the advancing mechanism by pushing against the shoe with one hand. Keep pushing on the shoe while pressing down the advancing mechanism removal button with your other hand.

Be careful not to let the spring eject when removing the mechanism.

Gradually reduce the pressure you apply to the shoe until the advancing mechanism has emerged from the magazine.


As the mechanism is spring-loaded, you need to be careful at this stage – use both hands to remove the mechanism, to avoid accidentally ejecting the spring.

Cleaning the Collated Screw Magazine

Clean tools to keep them in prime condition.

Take the magazine attachment off the screwdriver and detach the shoe from the advancing mechanism as described above.


Pull the return spring out of the magazine and soak the parts for 10 minutes in a container of soapy water. Rinse thoroughly, let the parts dry naturally then reassemble.

Attaching the Advancing Mechanism

How to re-install advancing mechanism in Dewalt screwdriver.

To re-install the mechanism, first make sure the lever arm is in the upright position (otherwise the mechanism will lock up). Line up the tabs on the shoe with the adjustment slots in the magazine housing. Push the shoe in slightly, then line up the spring with the pocket in the mechanism.


Press the advancing mechanism inwards until you can hear the shoe removal button click back into place.

Wonkee Donkee Tools
Logo