Our other sites:

How To Use A DeWalt Compact Screwdriver?

How to use a DeWalt Compact Screwdriver?

The Dewalt cordless screwdriver is compact and lightweight.

At Wonkee Donkee, we believe that before you use any power tools it is vitally important that you read and understand all of the functions and safety advice. Our number one tip is to always be safe when using any power tools and that includes wearing the appropriate personal protective equipment for the task!

Charge the Battery!

DeWalt battery charger used to make sure you charge the power tool battery.

For best results with all screwdrivers, charge the batteries up fully before first use. Plug the charger into a suitable 230V outlet before sliding the battery pack into the base of the tool. A red light will start blinking, showing that charging has begun.


When charging is complete – which will take about 40 minutes for a high capacity 2.0Ah battery pack – the light will remain on continuously.

Press the release switch to remove the battery.

To install the battery pack, line it up with the notch inside the handle of the screwdriver then slide the pack into the handle until you can hear the locking mechanism click into place.


You can remove the pack if required by pressing the release button at the base of the handle then firmly pulling the battery pack out.

Using the DeWalt Cordless Screwdriver

Inserting the Bit

The Dewalt cordless screwdriver has one-handed bit change.

It’s very easy to change bits on the DeWalt cordless screwdriver, and you can do it with one hand. Thanks to the quick change chuck you don’t even have to move the locking collar – you simply push the bit into the chuck until it clicks into place.


Make sure the forward/reverse button on the driver is set to the central (off) position first.

Setting Forward or Reverse Rotation

Press the forward & reverse button to set the direction of rotation.

Put the screwdriver into forward rotation by releasing the trigger, then pressing the forward/reverse button on the right side of the tool.


To put it into reverse, press the forward/reverse button on the left side. The forward position is for inserting screws or drilling, while the reverse setting is for removing screws or backing out drill bits.


The central part of the control switch locks the tool into the off position. Always check the trigger is released before you move the control button.

Selecting Torque

Torque control lets you alter the amount of turning force.

The screwdriver has 15 torque adjustment settings so you can fine-tune the turning force to suit the type and depth of material you’re working on.


Choose your torque range using the arrow on top of the adjustment collar, selecting a high setting for large screws or tough materials, and a lower setting for small screws or softer surfaces. To avoid damaging the screw head or workpiece, use the minimum torque level necessary to insert the screw to the required depth.


Before you start work on your project, check whether you’ve got the torque setting right by making a few practice runs on bits of scrap or on parts of the workpiece that won’t be visible afterwards.

Starting it Up

Squeezing trigger on Dewalt cordless screwdriver.

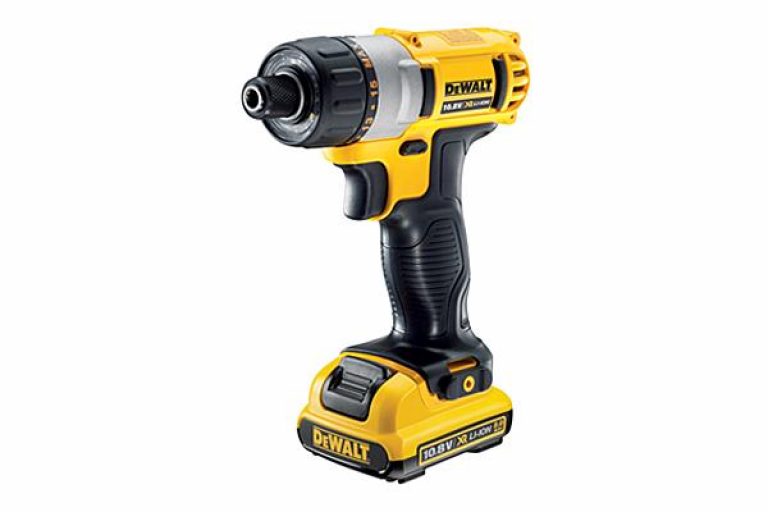
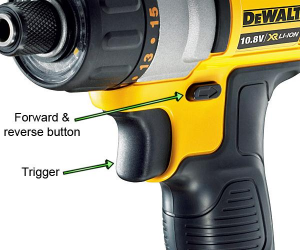
Gradually squeeze the variable speed trigger until the chuck and bit start to turn. You can increase or reduce the speed to suit the task. The screwdriver has a brake, so the chuck will halt as soon as you fully release the trigger.


The further you squeeze the trigger, the faster the tool will go, but the less torque it will deliver. The more you release the trigger, the slower the tool will go, but the more torque it will produce.


However, for maximum tool life you shouldn’t use the variable speed option continuously as it might damage the switch.

Using the DeWalt Driver in Drilling Mode

Turn collar to Max for drilling mode.

Turn the torque adjustment collar to the Max position when you want to use the drilling mode.


For safety, always check that the forward/reverse switch is locked off in the central position before you make any alterations or attach/remove accessories.


Make sure your workpiece is clamped or anchored firmly. When drilling into thin material, put a wooden block behind it to avoid damaging the surface.

Get Started!

Apply pressure in a straight line with the bit when drilling.

Hold the drill firmly, and make sure you always apply pressure in a straight line with the bit. Start off slowly, and let the weight of the tool do the work – use just enough pressure to keep the drill biting, but don’t push so hard that the motor stalls or the bit bounces off the surface.


When you’ve nearly finished drilling the hole, reduce the pressure on the tool and carefully ease the bit through the last few millimetres. This minimises the chance of the drill stalling or breaking through the material.


When you pull the bit back out of the hole, keep the motor running to help prevent jamming.

What to do if the Compact Screwdriver stalls?

Caution signs warn others of danger.

Let go of the trigger immediately, pull the drill bit out of your workpiece and investigate what caused the motor to cut out. Stalling usually only happens if the tool is being overloaded or used for unsuitable tasks.


On no account should you start pulling the trigger in and out in an attempt to restart the motor, as this could seriously damage the screwdriver. 

Wonkee Donkee Tools
Logo