


How to use a bench plane to plane end grain?
How to use a bench plane to
|
||||
 |
End grain planing is shaving across the short ends of a piece of wood, when the cutting edge severs the grain fibres laterally rather than shaving along them. This type of planing is generally considered more difficult than planing with the grain, as end grain offers more resistance and tear-out at the end of the cutting stroke is possible. | |||
 |
Many woodworkers use a block plane for end grain work. See for information about this small, versatile plane. | |||
 |
However, bench planes are also quite often used for this type of work. | |||
 |
The wood can be secured in the workbench vice. Position it with the end to be planed uppermost. | |||
 |
Alternatively, use a bench hook or shooting board to support the wood. Bench hooks and shooting boards are accessories that enable a piece of wood to be held firmly in position on the workbench while it is cut with a saw, a chisel or, in this case, a bench plane held on its side. See for more information, and a description of a plane that is dedicated to end grain planing. | |||
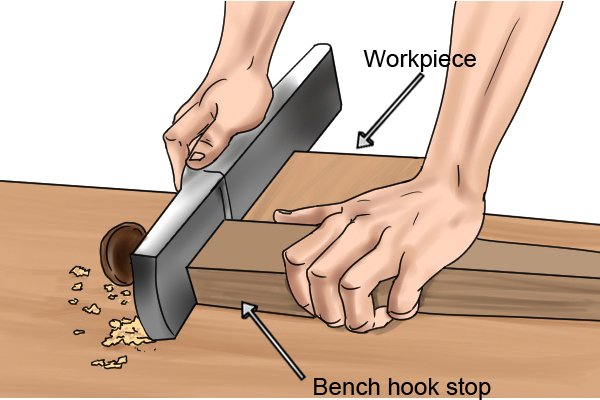 |
If using a bench hook, the workpiece is positioned with the end to be planed on the left or right side (depending on which is your dominant hand) and the plane slides on its side along either the workbench top or a step in the bench hook or shooting board. The bench hook or shooting board’s edge or step provides a guide for the sole of the plane. | |||
 |
Step 1 – Mark workpieceMark the workpiece with a pencil line indicating the depth to which you wish to plane. |
|||
 |
Step 2 – Check set-up of planeThe iron’s depth setting should be about the smallest possible when planing end grain. If the mouth or frog is adjustable, the mouth opening should be small. Ensure the iron’s cutting edge is perfectly horizontal across the width of the plane. If not, change the lateral position of the iron. |
|||
 |
Step 3 – Candle-wax soleThis is not essential if the end to be planed is small, but if there’s a fair length or width of end grain to be trimmed and/or smoothed, candle wax on the sole will reduce friction. |
|||
 |
Step 4 – Position planeIf using a vice, position the plane with the front (toe) of the sole flat on the workpiece and the cutting edge before the nearest edge of the workpiece. |
|||
 |
If your workpiece is secured on a bench hook or shooting board, position the plane on its side. | |||
 |
Step 5 – Make first forward strokeHold the plane perfectly square on the workpiece, press down on the knob and make the first cut. |
|||
 |
If your workpiece is secured in a vice,you will need to plane just halfway along the edge, as indicated by these arrows, then turn the workpiece and plane half-way from the other side. | |||
 |
Because the plane is cutting across end grain, planing all the way across would cause tear-out of the wood at the far edge. | |||
 |
If your workpiece is held on a bench hook, providing your workpiece is no higher than the front stop of the hook, the stop will act as protection against tear-out as long as the workpiece is held firmly against it. | |||
 |
Step 6 – Check shavingEnd grain shavings are often powdery, looking more like sawdust than the long, curly slivers you get when planing along the grain. Check that the shavings look consistent across the width of the plane. If they are not, check the iron’s lateral adjustment and ensure you are holding the plane perfectly horizontal when cutting. |
|||
 |
Step 7 – Return to starting pointReturn the plane to the starting point. Slightly lift the plane if you are using a vice. If using a bench hook, slide the plane backwards with the cutting edge out of contact with the workpiece. |
|||
 |
Step 8 – RepeatRepeat steps 5 to 8, remembering to plane only halfway and turn the wood around at intervals. Stop when you reach the pencil line, by which time the edge should be perfectly flat and smooth. |
|||
Another way of avoiding tear-out |
||||
 |
There’s another way of preventing tear-out of the far edge when planing end grain: clamp a piece of waste wood in contact with the edge of the workpiece. This acts as buttress, preventing any splintering of the edge of the workpiece. Plane across the entire edge and the waste wood. | |||
