Our other sites:

How To Use A DeWalt Hammer Drill?

How to use a DeWalt Hammer Drill?

Using a Dewalt hammer drill driver.

At Wonkee Donkee, we believe that before you use any power tools it is vitally important that you read and understand all of the functions and safety advice. Our number one tip is to always be safe when using any power tools and that includes wearing the appropriate personal protective equipment for the task!

Charge the Battery!

DeWalt battery charger used to make sure you charge the power tool battery.

For best results charge the batteries up fully before first use. Plug the charger into a suitable 230V outlet before inserting the battery pack, which slides in easily on rails inside the base of the tool. A red light will start blinking, showing that charging has begun. When charging is complete – which will take between 55 and 90 minutes, depending on battery capacity – the light will remain on continuously.

Inserting a Drill or Screwdriver Bit

Lock-Off Hammer Drill

DeWalt hammer drill lock off.

Disconnect the drill from its battery, then slide the forward and reverse button into the central position. This activates the spindle lock, which shuts off the tool and allows you to adjust the chuck one-handed and without any risk of injury.

Open Chuck Jaws

Turning Dewalt drill driver chuck anti-clockwise to unlock.

Hold the base of the chuck in one hand to steady the drill. With the other hand, turn the chuck’s collar in an anti-clockwise direction until its jaws open wide enough to accept the bit.

Insert Bit

Different chucks fit into drill bits.

Push the bit, or other attachment, into the jaws of the chuck as far as it will go until you feel it engage.


Tighten it up by turning the chuck’s collar in a clockwise direction with one hand while holding the drill with the other until the jaws are clamped tightly around the attachment.

Adjusting the Settings

Which Gear?

Gear switches on drill drivers.

Your hammer drill will have either two or three gears, and they serve the same purpose as the ones in a car. Selecting a low gear means the tool will run at a slower speed but deliver more torque. If you put it in a higher gear it will operate at a faster speed but deliver less torque.


Choose a high gear for working on softer materials or smaller screws, when less torque is required. A low gear is best for drilling, and for working on tough materials or larger screws, when more torque is needed.

Changing Gear

Dual Gear switch provides extra control.

Never change gears while the drill is running – always wait for it to come to a complete halt.


If your drill has two gears, to select speed 1 (high torque, low speed) you slide the gear shifter forward, in the direction of the chuck. To select speed 2 (low torque, high speed) slide the gear shifter backwards.

DeWalt Torque Ring and Gear Shifter diagram.

If your drill has three gears – common on upper range tools – push the gear shifter:


All the way forward to select speed 1 (highest torque level, slowest speed).


To the middle position for speed 2 (medium torque and speed).


All the way to the rear for speed 3 (low torque, highest speed).

Setting Torque Control

Adjusting torque on Dewalt hammer drill driver.

Find the arrow on top of the machine and rotate the numbered torque adjustment collar until the torque level you want is lined up with the arrow.


If the tool struggles to turn the screw, select a higher level of torque and try again. Hammer drill drivers are powerful machines, so always start on a low setting and increase it only if necessary. See Tips on Torque Control for more details.

Setting Forward or Reverse

Forward and reverse button to control the drill direction.

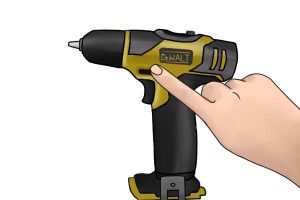
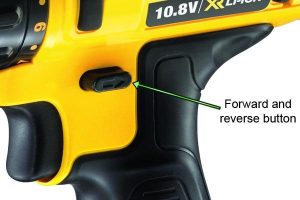
Put the hammer drill into forward rotation by releasing the trigger, then pressing the forward/reverse button on the right side of the machine.


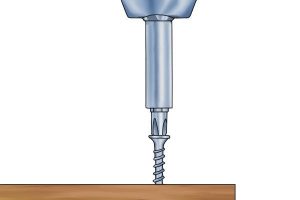
To put it into reverse, press the forward/reverse button on the left side of the machine. The forward position is for inserting screws, drilling or hammering, while the reverse setting is for removing screws or backing out drill bits.


The central part of the control switch locks the tool into the off position.


Top Tip: You might hear a click the first time you use your hammer drill driver after changing the direction of rotation. This is quite common and is not an indication of a problem.

Tips on using the DeWalt Hammer Drill

Setting hammer drill setting to drilling mode.

Only use sharp bits for drilling. Carbide-tipped bits rated suitable for percussion drilling are best for use on cement, brickwork and other masonry.


Choose the speed and torque range you require using the gear shifter, then turn the torque adjustment collar to the drill symbol. Grip the drill firmly with both hands to control its twisting action.

Keep it Straight

Apply pressure in straight line with the bit when drilling.

Make sure you always apply pressure in a straight line with the bit. Let the weight of the tool do the work – use just enough pressure to keep the drill biting, but don’t push so hard that the motor stalls or the bit bounces off the surface.


When you pull the bit back out of a drilled hole, keep the motor running to help prevent jamming.

Gently does it

For control begin drilling slowly and build up speed.

When you’ve nearly finished drilling the hole, reduce the pressure on the tool and carefully ease the drill bit through the last few millimetres. This minimises the chance of the drill stalling or breaking through the material.

What to do if the drill stalls?

Caution signs warn others of danger.

Let go of the trigger immediately, pull the drill bit out of the workpiece and find out what caused the motor to cut out. Stalling usually only happens if the tool is being overloaded or used for unsuitable tasks.


On no account should you start pulling the trigger in and out in an attempt to restart the motor, as this could damage the drill.

Tips on Screwdriving

Adjusting Torque

Screwdriving mode on a hammer drill.

As with drilling, choose your required speed and torque range using the gear shifter, then turn the torque adjustment collar until the arrow lines up with the screwdriving symbol.


Select the minimum torque level necessary to insert the screw to the required depth – the lower the number on the collar, the lower the torque output.

Getting Started

Extra control when drilling is provided with the inclusion of torque control.

Insert your screwdriver bit into the chuck as described above. Check whether you’ve got the torque setting right by making a few practice runs on bits of scrap or on parts of the workpiece that won’t be visible afterwards.


To avoid damaging your work or the screw head, always start with a low level of torque then increase it gradually as required.  

Tips on Hammer Drilling

Selecting Hammer Mode

Setting hammer mode on hammer drill by twisting the chuck.

Having selected your required speed and torque range, turn the torque adjustment collar so that the arrow lines up with the hammer drill symbol.


Make sure you use only carbide-tipped or masonry bits rated as suitable for percussion drilling.

Less is More

Drilling carefully with Dewalt hammer drill to ensure quality of your work.

Drill with just enough pressure on the hammer to keep it from bouncing around or rising off the bit. If you use too much force the drill will slow down and could also start to overheat.


Keep the drill straight – at a right angle to the workpiece. Don’t apply any side pressure, as this will make the flutes on the bit clog up and the drill will slow down.

Top Tip: Stuck in a hole?

Top tips for using an angelr grinder from wonkee donkee.

If the hammer speed begins to drop off while you’re drilling a deep hole, pull the bit partly out of the hole with the motor still running to help bring out debris.


As long as you can see a smooth, even flow of dust coming out of the hole it means you’re drilling at the right rate.

Wonkee Donkee Tools
Logo