


How to remove panelling using a moulding bar?
How to remove panelling
|
||||
What else will you need? |
||||
 |
A utility knife | |||
 |
A stud finder (sometimes called a ‘stud sensor’) | |||
 |
A pencil (a carpenter’s pencil is best) | |||
 |
A wooden shingle | |||
 |
A hammer | |||
 |
A marker pen (optional) | |||
Wonkee’s hoof-by-hoof guide |
||||
 |
Before removing your panelling, you will need to remove the dado rail and skirting boards (if applicable).
See our guides: How to remove skirting boards using a moulding bar?
|
|||
 |
Step 1 – Cut caulkIf necessary, use your utility knife to score the line of caulk around the top edge of the panelling panels. This step prevents damage to wallpaper, plasterboard or other wall materials when the panelling is pulled away. Start at the beginning of your panelling and run your knife blade along the line of caulk, pressing down firmly enough to cut through. |
|||
 |
(This may be unnecessary if your panelling was topped by a dado rail, which you should have removed at this stage.) | |||
 |
Step 2 – Locate studsCorrectly installed panelling will be fixed to the studs in the wall. To avoid breaking your panels as you pry them off the wall, it’s best to pry from the areas of your panelling which are fixed to studs; if you pry from an area between studs, in the middle of a panel, you are far more likely to break or splinter the wood. |
|||
 |
A stud finder locates studs beneath panelling and other surfaces by identifying changes in the electromagnetic field. | |||
 |
Using the stud finderPosition the stud finder on the wall and turn it on (how you do this depends on the model; most feature side buttons). |
|||
 |
Sweep the stud finder horizontally across your panelling until the sensors indicate that the edge of a stud has been found. The most common type of alert is a flashing LED light and an audible tone. | |||
 |
To ensure that what you’re reading is a stud and not a secondary mass such as a section of plumbing, check for neighbouring studs 405-610mm (16-24in) from the first – these are the standard distances at which studs are spaced. | |||
 |
Mark the location of each stud with a pencil. | |||
 |
Step 3 – Insert bar clawYou can now start removing your panelling panels. Hold your wooden shingle against the wall above the first marked stud. This will protect the wall from damage during prying with your moulding bar. |
|||
 |
With the heel resting against the shingle, insert the edge of your moulding bar’s straight claw beneath the top edge of the panelling panel. If necessary, you can tap the opposite end of your bar with a hammer. | |||
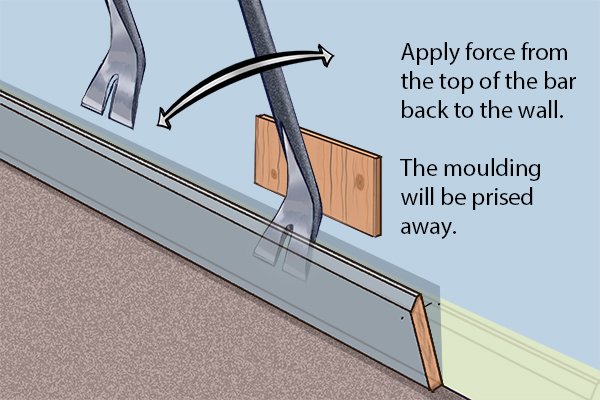 |
Step 4 – Apply forceApply force to the opposite end of the bar, pressing the heel back against the shingle to pry the panelling away from the wall at the first stud. You may hear some popping and ripping sounds; these are the nails pulling free of the stud. |
|||
 |
Step 5 – Repeat steps 3-4Repeat steps 3-4 for each marked stud. |
|||
 |
Step 6 – Remove panelsOnce you have created a wide enough gap between the panelling and the studs, you will be able to pull them off with your hands. Be gentle, and don’t force it; if you find a panel is still fastened too tightly to come away easily, re-insert your moulding bar and repeat steps 3-4 until it is free. |
|||
 |
Step 7 – Pull nailsRemove any protruding nails from your studs and the backs of your panels. For a full guide to nail pulling, see: How to pull nails using a moulding bar. |
|||
 |
Step 8 – Label panels (optional)If you will be replacing your panelling at a later time, it may be helpful to label each panel corresponding to the section of wall on which it fits. You can do this by numbering or lettering the back of each panel. |
|||
