Our other sites:

How to replace a wooden pick axe handle?

How to replace a wooden pick axe handle

Pick axe heads and handles can both be bought separately so should the handle break or wear loose, or the head become damaged there is no need to go out and buy a whole new tool. The process of replacing the head or handle of a pickaxe is the same.


What are the different types of wooden handle?

Firstly, you need to figure out what pickaxe handle is on your existing pick axe to determine what handle you need to buy in order to replace it.


There are two types of wooden pick axe handle. It is possible to tell how they fit by whether or not they have a slot cut in the top of them.


Wooden pickaxe handles with a slot cut into the top are fitted like axe or hammer handles.


Wooden handles without a slot have a wedge or tapered section and are fitted like fibreglass pick axe handles.

Tools Needed to Replace a Pick Axe Handle:

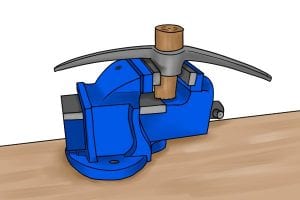
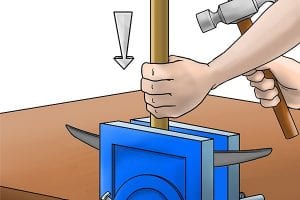
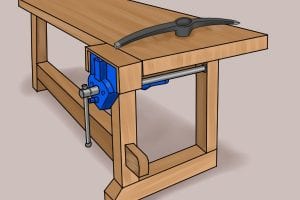
Vice: To hold the pick axe safely allowing you both hands to work on it


Saw: To cut the old handle off and cut excess off the top of the new one.


Hammer: For knocking out the old handle from the pick axe eye and driving wedges into the new handle.


Drill: To drill holes and help ease the old handle out from the eye of the pick axe head.


6mm drill bit: For use with the drill to help ease the old handle out from the eye of the pick axe head.


Sandpaper: To smooth down the top of the new handle and achieve a good fit with the pick axe head eye.


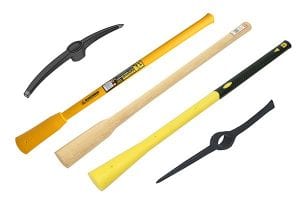
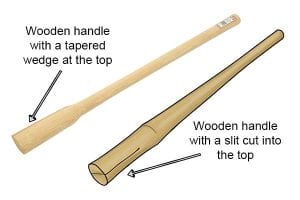
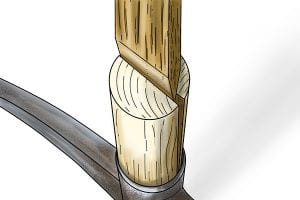
Wooden Handle: A new wooden handle with a slot at the top.


Chisel: To pry open the slot at the top of the new handle.


Wooden and Metal Wedges: For achieving a tight fit of the new handle in the pick axe head eye.

Guide to Replacing a Wooden Handle with a Slot

Step 1 - Remove Old Handle (Option 1)

Just as with fibreglass and wooden handles without a slot cut at the top, the first thing to do is separate the handle from the head of the pick axe.


If the existing wooden handle is broken but the head is being kept, then the easiest way to do this is to place the pick axe in a fire and let the old wooden handle burn away.


Leave plenty of time for the pick axe head to cool down before retrieving it.

Wonkee Donkee says: ‘This method is not recommended, as it may soften the metal of the pick axe head. Instead, use the alternative method of removing the old handle.’

Step 1 - Cut Away Old Handle (Option 2)

Secure the pick axe head in a vice and, using a saw, cut the old handle off close to the head of the pick axe.

Step 2 - Secure Pick Axe in Vice

Re-position the pick axe head in the vice so that the remaining part of the old handle is pointing vertically down.

Step 3 - Knock Out Old Handle

Using a hammer and the old handle as a punch, knock the remaining part of the old handle down through the eye of the pick axe head.

If step 3 does not work at first, then using the drill and a 6mm drill bit designed for use on wood, drill several holes in the top of the remaining old wooden handle.


This will release the pressure holding the handle in the eye, and by repeating step 2 should now separate the remaining handle from the head.


Step 4 - Place Head On a Solid Surface

Place the pick axe head on a solid surface with the underside facing up. The solid surface will provide a backstop to help push on the handle in the next stage.


Step 5 - Push On New Handle

Push the slotted end of the handle into the eye of the pick axe head.


Then turn the pick axe handle with the head on the correct way up with the base of the handle on the ground and push down on the head until the top of the handle is slightly proud of the top of the metal head.


If the handle is a very tight fit it may need a bit of sanding down in order to get it to fit.


Step 6 - Fix Handle with Wedges

Using a chisel to prise the slot in the top of the handle open, place a wooden wedge in it.


Then, with a hammer, drive the wooden wedge into the slot.


Step 7 - Cut Off Excess Handle and Wedge

Cut back the excess protruding part of the wooden wedge so that it’s level with the top of the handle.


Step 8 - Knock in Securing Wedges

Finally, drive one or two metal wedges into the top of the handle at a right angle to the wooden wedge, using a hammer.


Replacing a Wooden Handle Without a Slot

Step 1 - Remove Pick Axe Head

Hold the metal head with both hands and bang the thin end of the handle down, against a wooden board or some thick sheets of card laid on a solid flat surface, this protects the end of the handle from damage. Once the head starts to move it will easily separate from the handle.

Step 2 - Replace Pick Axe Head

Begin by holding the handle so that the wider end is resting on the ground.


Then, place the base of the handle through the pick axe head eye and slide the pick axe head down from the narrow base of the handle to the wider tapered section.

Step 3 - Secure Pick Axe Head in Place

Once the pick axe head is sat on the tapered section of the handle, hold the thin end, then raise it up and firmly hit the wedged end of the handle onto a firm solid base.


Repeat this several times and it will secure the pick axe head to the tapered part of the handle.

Once secured in place, the pick axe head should hold firm and the force of using it will actually help keep the head firmly in place on the handle.


You should check to see that the head is secure before you use your mattock. If it is loose, repeat step 3.

Note: Remember to use a wooden board or sheets or card to protect the handle of your pickaxe when removing or replacing the head.

Wonkee Donkee Tools
Logo