Our other sites:

How to apply tyrolean with a manual coating sprayer?

How to Apply Tyrolean with a Manual Coating Sprayer

Preparation is the key to success. Without it, you could end up with all your future efforts wasted and back to square one minus a lot of money.


Top tip: Tyrolean can be quite expensive, so unless it is needed to complete repair work, you can create a similar effect by mixing 4 parts sand with 2 parts cement and 1 part lime.

Wall Preperation

The first thing that needs to be done before you apply tyrolean is to ensure that the wall is clean and not in need of any repairs. If this isn’t done properly then the finish of the tyrolean may not be as you desired.

Step 1 - Clean and Repair Wall

Make sure the wall area to be covered is free from dust, moss, loose brickwork or mortar. Any damaged areas must be repaired.

Step 2 - Dampen Wall

Brush the wall down with water so that it’s damp but not saturated, ready for the first mix. This helps the render to stick to the all and prevents it from drying out too fast.


When an applied mix dries out too quickly, it doesn’t bond to the wall adequately. When this happens, the applied mix can crack, become loose and fall away from the wall.

However, take care not to apply tyrolean to sodden (extremely wet) backgrounds, as this may result in the mixture failing to stick to the wall and coming off. Uneven colouring of the finished surface can also occur.

Repairing Different Wall Surfaces

There are different things that you need to do in order to repair or clean walls before applying tyrolean with a manual coating sprayer depending on the construction material. Below we have explained the best things to do for each different wall surface.

Repairing Brickwork for Tyrolean

If you are applying tyrolean directly on to brick, mix it with water to a consistency of emulsion paint and apply it by brush over the wall area to be treated. This will cover any areas that may be missed when applying the tyrolean with the manual coating sprayer.


This also helps to neutralise the suction in the background before the base coats of tyrolean are applied. Let the base coat(s) dry completely before applying the final coat.

Repairing Uneven Walls for Tyrolean

If the wall to be coated is not flat, it will need a render applied first before the tyrolean is applied. The render is usually a mix of cement, sand and lime mixed with clean water. The ratio of mix is 1:2:1 respectively.


The render is applied with a plasterer’s or ‘screeding’ trowel in smooth even strokes at a thickness of approximately 10-16mm (3/8 – 5/8″), ensuring the mix is wet and not too dry.

It then has to be scratched to help the Tyrolean layer bond/stick to it well. Scratching tools such as ‘plasterer’s scratchers’ or ‘scarifiers’ are best for this as they cover a wide area and are easy to use.


Scratching the area to be covered with tyrolean allows for a far better adhesion than if not scratched.

Mixing Tyrolean

Step 1 - Add Tyrolean to Water

When the render (also known as the base or first coat) has dried, mix the tyrolean with water to a sloppy paste, similar to a thick emulsion paint texture.


To do this, pour approximately 4-5 litres of clean water into a bucket and add 25kg of tyrolean powder, then stir. The mix is best combined in a clean flexible bucket.

This water to powder ratio is important in getting the right consistency. Take careful note of the ‘how to mix’ directions on the tyrolean bag and mix accordingly.


You can use a hand mixer or one that fits into a variable speed drill.

Step 2 - Add Waterproofer

Waterproofer should be added into the mix before applying to the wall. This will help prevent rainwater penetrating the cement mix and getting to the brickwork.


Always read the usage instructions on the container to ensure the correct amount is used with each mix.

Step 3 - Add Plasticiser

Always use a cement or mortar plasticiser when mixing. This will give a smoother effect to the cement mix and give you a bit more time to work with the mix before it starts to dry.

Applying Tyrolean with a Manual Coating Sprayer

Step 1 - Load Tyrolean into the Manual Coating Sprayer

Load the tyrolean mixture into the manual coating sprayer by hand using a small shovel or equivalent.


Avoid scooping it in using the sprayer itself as this method can get messy!

Step 2 - Test the Manual Coating Sprayer

Practise spraying on a test-piece (e.g. a piece of plasterboard) before moving on to the wall to be coated.


You will discover that adjusting the tensioner and holding the sprayer at different angles to the test piece will result in different textures and finishes.

The mix will be applied thinly or more thickly depending on the tensioner position.


Keep turning the handle and making adjustments until you are happy with the texture and amount of mixture being sprayed.

Step 3 - Test the Manual Coating Sprayer

Once you have decided on the type of finish you want, hold the sprayer at the wall at the same angle as on your test piece and turn the handle clockwise. The tyrolean will then be flicked onto the wall surface. Hold the sprayer close to your body. This will help support the sprayer and give you more control when moving along the wall.

Move at a constant speed along the wall, as moving at different speeds will result in uneven coverage. Hold the sprayer at the same angle as on your test piece (between a right angle and 45 degrees to the wall) and make smooth constant rotations of the handle as you move along the wall area to be coated.

Adjust the tensioner again if needed, to alter the texture and overall appearance of the tyrolean to suit your needs. Most applications are done with the sprayer facing square to the wall.

How to Create Different Finishes?

Step 1 - Figure Out the Number of Layers Needed

The honeycomb texture is obtained by building up several passes in continuous light sprays, moving in an arc from 45 degrees left to 45 degrees right, returning over the same area until the required thickness is obtained.


Care should be taken to avoid merging and patchiness in the texture by leaving sufficient time between passes, as determined on your practice area prior to spraying the wall.

Coating Thickness

A minimum coating thickness of between 5 and 8mm (3/16 and 5/16″) is required. Although some professionals will insist on a 6 to 10mm (1/4 to 3/8″) coverage thickness. Be patient and build up your covering with several light layers gradually. This will give you a far better result than trying to do a thick coat all in one go.

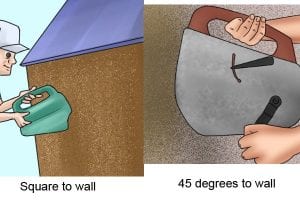
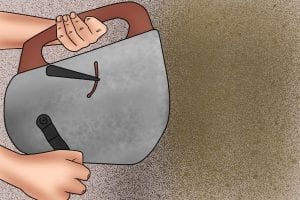
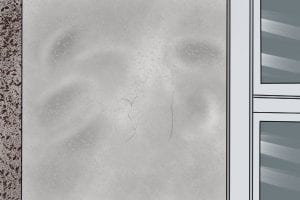
Try not to go any thinner than the 5mm (3/16″), as the thinner the coverage thickness, especially on a dry or over wet wall surface, the more likely it is to crack.


If this happens, large areas of the covering can break off, leaving your wall exposed and all your hard work down the drain!

Top Tips for Applying Tyrolean with a Manual Coating Sprayer

Manual coating sprayers can be heavy when full of the tyrolean mix. Be aware that this can be very exhausting to use all day on large coverage areas.

The average manual coating sprayer will consistently cover an area of approximately 1.5 square metres (1.5m2) of tyrolean at a time. This will vary depending on the capacity of the sprayer casing and how much it is filled each time with the tyrolean mix, by the user.

On average, a weight of 5kg per square metre is usually necessary to achieve a good density of coverage. Tyrolean is usually supplied in 25kg bags.

Wonkee Donkee Tools
Logo