Our other sites:

Tips On Using A DeWalt SDS-Plus Drill

Tips on using a DeWalt SDS-Plus Drill

Dewalt SDS plus drill with labelled parts.

At Wonkee Donkee, we believe that before you use any power tools it is vitally important that you read and understand all of the functions and safety advice. Our number one tip is to always be safe when using any power tools and that includes wearing the appropriate personal protective equipment for the task!

Selecting Operating Mode

SDS plus drill mode selector diagram.

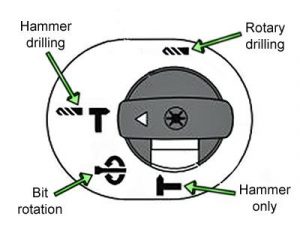
Line up the arrow on the mode selector dial with one of the following symbols:


Rotary drilling – for driving screws and drilling into wood, steel and plastics.


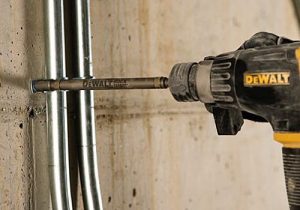
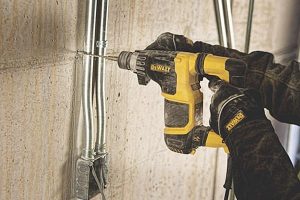
Hammer drilling – for drilling into masonry and concrete.


Hammer only – for light chiselling, chipping and demolition tasks (only possible with three-mode models).


Bit rotation (non-working position) – for rotating a flat chisel to the required working angle.

Setting Up Chisel

Deep hex pocket in angle drill chuck.

To attach a chisel (with three-mode SDS+ drills only): First turn the mode selector to the bit rotation symbol, then rotate the chisel to your chosen position.


Set the mode selector to the hammer only position then twist the chisel until it locks in place.

Inserting and Removing SDS+ Bits

SDS plus drill - insert bit in tool holder.

Clean and grease the shank of the bit, then insert it into the tool holder and locking sleeve assembly. Push the bit down and rotate it slightly until it fits into the slots.


Pull on the bit to make sure it’s secure. It should be able to move a few centimetres to enable the hammer function to work, but not come loose.


To remove the bit, simply retract the tool holder/locking sleeve so that you can pull out the bit.

Setting Drilling Depth

Setting depth rod on SDS plus drill.

Having inserted the appropriate drill bit, press the depth stop clamp and hold it down so that you can slide the depth adjustment rod through the hole in the clamp.


To get the right depth, pull back the rod so that the distance between the tip of the rod and the tip of the drill bit is the same as the drilling depth that you require.

Selecting Forward or Reverse Rotation

SDS plus drill - changing direction of rotation.

Put the drill into forward rotation by releasing the trigger, then pushing the forward/reverse slider to the left (when viewed from the operating position).


To put it into reverse, release the trigger and push the slider to the right. The forward position is for drilling or hammering, while the reverse setting is for backing out drill bits from tight holes.


To avoid damaging your drill, always wait for the motor to come to a complete halt before changing the direction of rotation.

Getting Started with an SDS-Plus Drill

Switching On and Off

Variable Speed Trigger on DeWalt Power Tools.

To get the drill going, press the variable speed trigger. The harder you squeeze it, the faster the tool will run.


Let go of the trigger to bring the tool to a standstill.


To lock the drill in the off mode, push the forward/reverse slider to the central position.

Making the most of Active Vibration Control

Top tips for using an angelr grinder from wonkee donkee.

This feature neutralises rebound vibration from the hammer action, which makes the drill more comfortable to use for long periods and extends tool life.


For the best results, hold the drill with one hand on the main handle and the other on the side handle. The hammer only requires just enough pressure to engage the active vibration control. Pressing too hard won’t make the drill work any faster, and in fact may stop the vibration control from working at all.

A Few Tips on drilling

Hammer Drilling with a Solid Bit

SDS plus drill being used with a solid bit.

Turn the mode selector to the hammer symbol and insert your bit – for best results use high quality carbide bits. Adjust the side handle and, if required, set the drilling depth.


Mark the spot for the hole, position the drill bit over the spot and switch on the machine. To avoid damaging your work or the surrounding surface, start with a low speed then increase it to full power if needed.

Hammer Drilling with a Core Bit

SDS plus drill core bit.

Move the mode selector to the hammer drilling icon, insert the core bit and assemble the centre drill into the bit.


Put the centre drill on the spot and squeeze the variable speed trigger. Drill until the core reaches a depth of about 1cm in the concrete, then stop and remove the centre drill. Put the core bit back into the hole and carry on drilling.

Top tips for using an angelr grinder from wonkee donkee.

If you’re drilling through material thicker than the depth of the core bit, break away the round cylinder of concrete inside the bit at frequent intervals.


To avoid accidentally breaking off concrete around the edges of the hole, first drill a hole of the same diameter as the centre drill right the way through the material, then drill the cored hole halfway from each side.

Rotary Drilling

SDS-plus drills are very powerful.

The procedure for rotary drilling is mostly the same as for hammer drilling. Set the mode selector to the rotary position then fit the chuck assembly, having first screwed on an adaptor if required. Never use standard chucks in the hammer drill mode.

Driving Screws

SDS-Plus screwdriving adaptor.

For this you need a special SDS-Plus screwdriving adaptor. Turn the mode selector to the rotary drilling symbol and set the direction of rotation, then insert the adaptor and bit. If the screw has a slotted head, use a bit with a finder sleeve.


If you’re inserting a screw, put only gentle pressure on the variable speed trigger to avoid damaging the screw head. (When removing a screw this is not necessary, as the reverse rotation mode will automatically reduce the tool speed.) Release the trigger as soon as the screw head is flush with the workpiece to prevent it being driven in too far.

Chipping and Chiseling

SDS plus drill chipping mortar.

This is only possible with a three-mode drill. Turn the mode selector to the hammer only position, then insert your chisel and rotate by hand to lock it in place – you will have a choice of 51 or 52 different positions, depending on the model of drill.


Adjust the side handle, switch on the tool and you’re ready to go. When you’ve finished working, always switch off the drill before unplugging.

Wonkee Donkee Tools
Logo