


How to use a sprue cutter?
How to use a sprue cutter? |
||||
 |
How you use a sprue cutter will depend on the type and size of the tool. | |||
How to use tweezer-style sprue cutters |
||||
 |
Step 1 – Hold cuttersTweezer-style sprue cutters should be held in your dominant hand between your thumb and forefinger, just as you would a pair of tweezers. |
|||
 |
Step 2 – Position cuttersPlace the outside edge of the tweezer sprue cutter jaws up against the part you want to remove from the sprue. |
|||
 |
Step 3 – Cut sprueSqueeze the two sides of the sprue cutter between your thumb and forefinger to bring the jaws together and cut the sprue. |
|||
 |
||||
How to use a small single lever action sprue cutter |
||||
 |
Step 1 – Hold cuttersThis type of sprue cutter should be held in your dominant hand. One of the handles should rest in the palm of your hand, while the other should rest on the pads of your fingers. |
|||
 |
Step 2 – Position cuttersIn order to achieve the best finish on the cut of a sprue, you should place the flat outside face of the jaws against the edge of the part you are removing. This will help to minimise the size of the nub left on the part being removed from the sprue. |
|||
 |
Make sure the sprue is in the recommended cutting area of the jaws. This will allow you to apply the greatest cutting force possible with the sprue cutter and minimise the effort required. | |||
 |
Step 3 – Cut sprueBring the jaws together by squeezing the two handles between the palm of your hand and fingers. |
|||
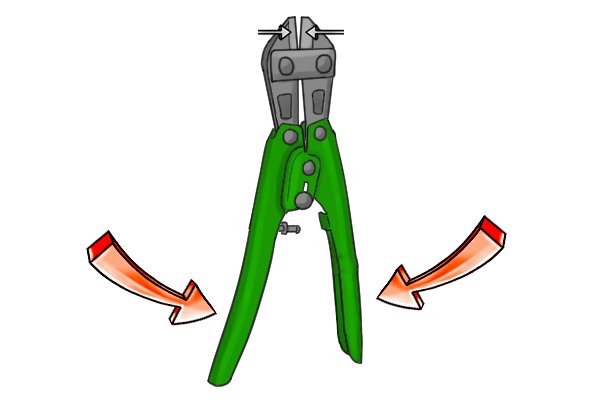
How to use a large compound lever action sprue cutter |
||||
 |
Larger compound lever action sprue cutters differ in their operation from other sprue cutters mainly because you use two hands to operate them. | |||
 |
Step 1 – Hold cuttersYou should hold large compound lever action sprue cutters with one hand at the base of each handle. This will allow you to apply more leverage and so a greater cutting force. |
|||
 |
Step 2 – Position cuttersPlace the wire or sprue between the sprue cutter jaws within the recommended cutting area. This is particularly important with thick or hard materials in order to reduce the effort required to cut them. |
|||
 |
Step 3 – Cut materialPress the handles together so that the jaws close on the wire or sprue being cut. |
|||
