


Wonkee Donkee’s Top Tips for using a Hand Drill or Brace
Wonkee Donkee’s top tips for using
|
||||
 |
When using a hand drill or brace to drill or drive screws into a workpiece, there are a few simple tips that can make the job easier and quicker and reduce the chances of you damaging the work. | |||
Preventing wood from splitting when driving in screws |
||||
 |
Driving a screw into a piece of wood can sometimes cause the wood to split.
This is more likely to occur when driving a screw into a piece of wood close to its edge, or with hardwoods. |
|||
 |
What causes wood to split?When you drive a screw into wood you have to displace the space that the screw will occupy. This forces the fibres of the wood apart, and, if this is done too close to the edge of the wood, can result in the wood splitting. Hardwoods are generally denser and so have more fibres closely packed together, this means you have to force more of them out of the way to make room for the screw, which is why hardwoods can split more easily. |
|||
 |
What is the solution?The solution to this problem is to drill a pilot hole prior to driving the screw into the wood. The pilot hole removes some of the material that the screw needs to displace, which reduces the chance of the wood splitting. |
|||
 |
The drill bit you use for the pilot hole should be the same diameter as the screw’s shank excluding the width of the threads.
This will allow the threads of the screw to still grip the wood but as most of the wood where the screw will sit has been removed by the pilot hole, the pressure to force the wood fibres apart will be reduced so the wood should not split. |
|||
 |
You should always drill a pilot hole when drilling into hardwood, not only to prevent the wood from splitting, but also to prevent the screw from snapping as you drive it in. | |||
 |
||||
 |
When drilling a pilot hole, you may also wish to create a countersink for the head of the screw. This will allow the head of the screw to sit flush or just below the surface of the workpiece. | |||
 |
Wood filler can then be used to completely conceal the screw in your finished project. | |||
 |
Special countersink drill bits (sometimes called screwdiggers, pilot bits, or screwsinks) can be purchased that will make the pilot hole and countersink in one action. | |||
Screwing two pieces of wood together |
||||
 |
When screwing two pieces of wood together, there can be a tendency for the screw to push the top piece of wood away from the bottom one as the screw enters the second piece of wood. This can create a gap between the two pieces. | |||
 |
How can I prevent this?The best way to prevent this from happening is to drill a pilot hole into both pieces of wood but enlarge the pilot hole in the top piece of wood to the diameter of the screw’s shank including the threads (this section is called the clearance hole). This will allow the shank of the screw to pass through the first piece of wood before the threads grip the second piece, pulling the two together. |
|||
Drilling at an angle to the workpiece surface |
||||
 |
Whenever possible, it is always better to drill at a 90 degree right angle to the workpiece surface. However, there may be occasions when this is not possible and you have to drill at an angle. | |||
 |
One of the biggest problems with drilling at an angle is that initially the drill bit will want to wander across the surface of the workpiece. | |||
 |
What is the solution?The best way to overcome this problem is to drill a starter hole into the workpiece of just a few millimetres depth at a right angle to the workpiece surface. |
|||
 |
Then reposition the drill at the angle you want to drill, within the small starter hole you have made.
This starter hole will help to prevent the drill from wandering across the surface of the workpiece. |
|||
How to drill holes in acrylic |
||||
 |
The biggest problem when drilling holes in acrylic is preventing it from splitting or cracking.
This is normally caused by trying to drill too large a hole straight away. |
|||
 |
How can I prevent this?The easiest way to prevent this is to use a stepped drill bit. These are shaped like a cone made up of different stepped diameters. |
|||
 |
As you drill into the material, the hole is progressively widened by each step of the drill bit.
The progressive way in which the hole size is created helps to prevent the acrylic from splitting or cracking. |
|||
| |
||||
 |
Other things you can do when drilling acrylic to reduce the risk of it cracking include placing a piece of wood under the area of the acrylic you want to drill.
This will help to prevent the acrylic from flexing as you drill into it, and works even better if you are able to clamp the acrylic to the piece of wood. |
|||
 |
Leaving the plastic film covering on the acrylic when you are drilling holes through it also helps to prevent cracking and serves to protect the surface of the acrylic a little more in the event that the drill bit slips. | |||
Drilling larger holes in metal |
||||
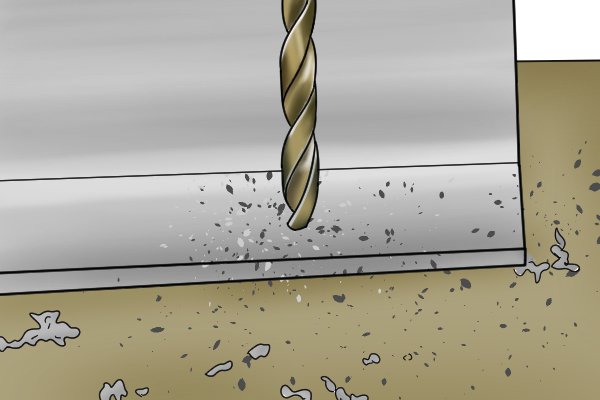 |
Drilling holes in metal is a little harder than wood, especially if you are using a hand drill. This becomes even more of a problem if you need to drill a larger hole that is, say, greater than 6mm (1/4″). | |||
 |
What is the solution?Similar to drilling acrylic, the best way to accomplish this is to start with a small hole and then enlarge it. After measuring where you want your hole to go, use a centre punch to mark the position and create a slight indent in the metal. This helps to position the drill bit and keep it from wandering across the surface of your metal workpiece. |
|||
 |
Begin by using a small drill bit of about 4mm (5/32″) in diameter. As small drill bits such as these can be brittle, you should not apply too much pressure.
Once you have made a hole with the 4mm (5/32″) bit, replace it in the chuck with a 6mm (1/4″) bit and enlarge the hole you have already created. |
|||
 |
Repeat this process with the next size drill bit. At this point you may wish to use a hand drill with a breast plate fitted so you can apply more pressure whilst drilling, as these larger drill bits are less likely to snap.
Continue increasing the size of the drill bit in small increments until you achieve the hole size you want. |
|||
Drilling larger holes in wood |
||||
 |
An auger bit is the best tool to drill larger holes in wood.
However, if you drill all the way through a piece of wood with an auger bit, it can tear out, creating an untidy exit to the hole. |
|||
 |
How can I prevent this?There are two ways of preventing this. First, you can stop drilling into the wood once the lead screw of the auger breaks through the far side of the wood. |
|||
 |
Then, if you turn the piece of wood around, you can use the hole created by the lead screw as a guide and drill back through the wood with the auger. | |||
 |
The second way is to clamp a piece of wood (called a backing block) to the workpiece you want to drill. As the auger bit exits the back of the workpiece, it will immediately enter the backing block you have clamped to it, this prevents the auger tearing out the back of the workpiece as it continues to drill into the backing block.
Continue drilling until the auger has passed all the way though the workpiece, then you will have a nice clean and tidy entry and exit to the hole. |
|||
Ensure you are drilling horizontally |
||||
 |
||||
 |
Before fitting the auger bit in the chuck of your brace, place a ring over the shank of the auger bit. | |||
 |
Then as you begin to turn the brace and the auger drills into the workpiece, the ring should stay in the same position on the auger’s shank.
If the ring starts to move down the auger’s shank away from the chuck, the auger bit is being angled downwards. |
|||
 |
If the ring starts to move up the auger’s shank towards the chuck then the brace is angling the auger bit upwards. | |||
