Our other sites:

How to open and close a folding square?

How to open and close a folding square?

Shop for Folding Squares
Carpenters square, folding squares, carpenter, carpentry, angles, woodwork, measuring, framing, right angle, stone masonry, building, construction, flooring, paving, DIYer. 
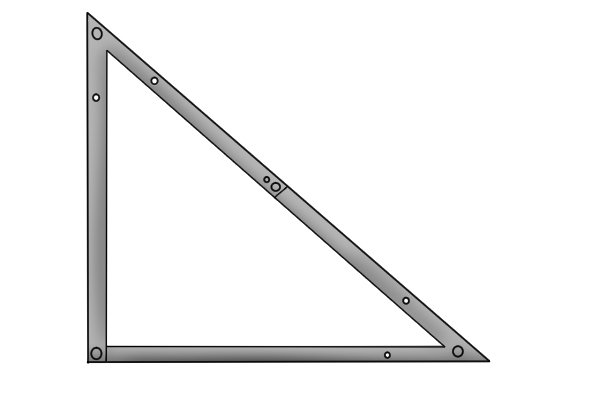
A folding square can be folded, in order to easily store it when it is not in use. This saves space and avoids any unnecessary damage to the folding square.

Opening a folding square with a locking mechanism

Carpenters square, folding squares, carpenter, carpentry, angles, woodwork, measuring, framing, right angle, stone masonry, building, construction, flooring, paving, DIYer.

Step 1 – Grip folding square

Grab either side of the folded square.

Carpenters square, folding squares, carpenter, carpentry, angles, woodwork, measuring, framing, right angle, stone masonry, building, construction, flooring, paving, DIYer.

Step 2 – Pull sides

Pull the sides away from each other to open the folding square.

Carpenters square, folding squares, carpenter, carpentry, angles, woodwork, measuring, framing, right angle, stone masonry, building, construction, flooring, paving, DIYer. Keep pulling the sides until the triangular frame of the folding square takes shape.
Carpenters square, folding squares, carpenter, carpentry, angles, woodwork, measuring, framing, right angle, stone masonry, building, construction, flooring, paving, DIYer.

Step 3 – Lock folding square

Once the folding squares frame is completely open you need to lock it in place using the stopper. Slide the stopper underneath the top side of the folding square and let it slot into place. This will then enable the frame to be stable when being used.

Closing a folding square with a locking mechanism

Carpenters square, folding squares, carpenter, carpentry, angles, woodwork, measuring, framing, right angle, stone masonry, building, construction, flooring, paving, DIYer.

Step 1 – Release stopper

Push the stopper downwards. At the same time, lightly lift the side where the stopper is located, this will release the stopper from the groove where it sits. This will then allow the side to split and be able to fold.

Carpenters square, folding squares, carpenter, carpentry, angles, woodwork, measuring, framing, right angle, stone masonry, building, construction, flooring, paving, DIYer.

Step 2 – Close side

Once the stopper is released from its groove, push the centre of the side towards the opposite corner.

Carpenters square, folding squares, carpenter, carpentry, angles, woodwork, measuring, framing, right angle, stone masonry, building, construction, flooring, paving, DIYer. Keep pushing the centre of the side until it folds on itself.
Carpenters square, folding squares, carpenter, carpentry, angles, woodwork, measuring, framing, right angle, stone masonry, building, construction, flooring, paving, DIYer.

Step 3 – Close folding square

Hold both sides of the folding square and push them together.

Carpenters square, folding squares, carpenter, carpentry, angles, woodwork, measuring, framing, right angle, stone masonry, building, construction, flooring, paving, DIYer. The stoppers on either end of the side you are pushing will line up with the grooves and slot in place.
Carpenters square, folding squares, carpenter, carpentry, angles, woodwork, measuring, framing, right angle, stone masonry, building, construction, flooring, paving, DIYer. Once they are slotted into the grooves, the folding square is then completely folded. The stoppers are used to lock the folded square in place and not let it slide out of position.

Opening a sliding folding square

Carpenters square, folding squares, carpenter, carpentry, angles, woodwork, measuring, framing, right angle, stone masonry, building, construction, flooring, paving, DIYer.

Step 1 – Release stopper

Hold the sides of the folding square that are located underneath the stopper and the groove. Pull the sides out from underneath, so the stopper slides out of the groove.

Carpenters square, folding squares, carpenter, carpentry, angles, woodwork, measuring, framing, right angle, stone masonry, building, construction, flooring, paving, DIYer.

Step 2 –  Unfold sides

Keep pulling the sides until the the stopper slides towards the end of the slot.

Carpenters square, folding squares, carpenter, carpentry, angles, woodwork, measuring, framing, right angle, stone masonry, building, construction, flooring, paving, DIYer. As you pull the sides further out, the stopper makes its way further up the slot eventually to the end.
Carpenters square, folding squares, carpenter, carpentry, angles, woodwork, measuring, framing, right angle, stone masonry, building, construction, flooring, paving, DIYer. Once you have pulled the sides all the way out, the stopper will sit in the groove on the end of the slot.
Carpenters square, folding squares, carpenter, carpentry, angles, woodwork, measuring, framing, right angle, stone masonry, building, construction, flooring, paving, DIYer. This will then lock in place, making the folding square stable and ready to use.

Closing a sliding folding square

Carpenters square, folding squares, carpenter, carpentry, angles, woodwork, measuring, framing, right angle, stone masonry, building, construction, flooring, paving, DIYer.

Step 1 – Position hands

Place your hands on the two longest sides of the folding square, shown in the picture.

Carpenters square, folding squares, carpenter, carpentry, angles, woodwork, measuring, framing, right angle, stone masonry, building, construction, flooring, paving, DIYer.

Step 2 – Push side

Push the side that is labelled in the picture towards the opposite side of the folding square.

Carpenters square, folding squares, carpenter, carpentry, angles, woodwork, measuring, framing, right angle, stone masonry, building, construction, flooring, paving, DIYer. Pushing the side will cause the stopper that is located on the bottom side of the folding square to slide across the slot.
Carpenters square, folding squares, carpenter, carpentry, angles, woodwork, measuring, framing, right angle, stone masonry, building, construction, flooring, paving, DIYer.

Step 3 – Fold bottom side

Keep pushing the side until the bottom side of the folding square lifts and and folds.

Carpenters square, folding squares, carpenter, carpentry, angles, woodwork, measuring, framing, right angle, stone masonry, building, construction, flooring, paving, DIYer. Now push the bottom and the side together, so it moves up towards the longest side of the folding square.
Carpenters square, folding squares, carpenter, carpentry, angles, woodwork, measuring, framing, right angle, stone masonry, building, construction, flooring, paving, DIYer. This will then align the the two sides you are pushing.
Carpenters square, folding squares, carpenter, carpentry, angles, woodwork, measuring, framing, right angle, stone masonry, building, construction, flooring, paving, DIYer.

Step 4 – Lock stopper

The folding square should now be one length with each side on top of each other. Turn the folding square over and push the stopper into the groove. This will lock the all three of the sides together so they do not come loose.

Wonkee Donkee Tools
Logo