


How to use a triangular engineer’s straight edge?
How to use a triangular engineer’s
|
||||
|
|
||||
Other equipment you will need: |
||||
 |
Engineer’s spotting inkThis is used to highlight the areas on the workpiece that have high spots which need scraping. There are many types of spotting ink that can be used in scraping; the most popular is Prussian Blue. |
|||
 |
Small rollerA small rubber roller is best, although the foam sort you would use in decorating can also be used. This is used to roll a thin, even layer of spotting ink. |
|||
 |
Microfibre clothThe microfibre cloth lifts dirt from the surface of the workpiece, leaving it clean and ready to be scraped. |
|||
 |
BrushYou will need a soft-bristled brush to clean off the scraped metal from your workpiece. |
|||
 |
Engineer’s scraperAn engineer’s scraper is used to scrape off and remove high spots from the surface of a workpiece, making it flatter. |
|||
Begin work |
||||
 |
Step 1 – Clean & ink workpieceBegin by first checking that your workpiece and triangular engineer’s straight edge are clean. Use the soft-bristled brush to remove any dirt and then wipe over both the straight edge and workpiece with a microfibre cloth. Once this is done place a small amount of spotting ink on the two working faces of the triangular straight edge and spread it out with the small roller. |
|||
 |
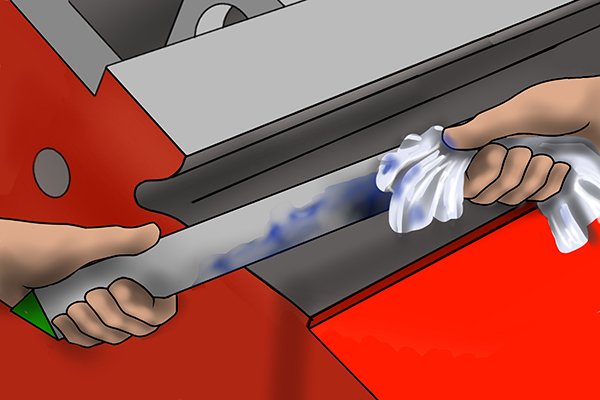
Step 2 – Rub straight edge in dovetailCarefully place the straight edge into the dovetail or machine guide way of the workpiece. Then, move the straight edge back and forward in the dovetail or machine guide way. This process is called ‘rubbing’. Once this is complete carefully remove the straight edge from the dovetail or machine guide way of the workpiece. |
|||
 |
Step 3 – Scrape high spotsAt this stage, you should have a few large spots of ink inside the dovetail or machine guide way of the workpiece. These are the areas that need scraping. Scrape away the inked high spotted areas on the workpiece, in a series of close, straight parallel lines. Only scrape the inked areas. Repeat this step, going back over the same area, but at a right angle to the previous scraped lines. |
|||
 |
Step 4 – Repeat inking & rubbingClean off the workpiece with a soft-bristled brush to remove any dust created in the scraping process. Then, wipe the workpiece over with a microfibre cloth before repeating steps 1 and 2. Each time you roll out an area of spotting ink on the engineer’s straight edge, try and make it slightly thinner than the previous time. This will help to highlight smaller high spots on the workpiece. |
|||
 |
Step 5 – Repeat scrapingNow the high spotted area marked with ink should be larger than the first time. Continue repeating steps 1-4 until the entire surface inside the dovetail or machine way of the workpiece is evenly covered with high spots, at which stage the workpiece is considered to be straight and flat. |
|||
