


How to cut a mortise and tenon joint with a wood chisel?
How to cut a mortise and tenon joint with a wood chisel? |
||||
 |
||||
 |
One of the oldest and strongest known carpentry joints is the mortise and tenon joint. Follow the step-by-step guide below and get in the know. | |||
Marking out the joint |
||||
 |
Step 1 – Select timberStart by selecting two pieces of timber: one piece for the mortise (M) and one piece for the tenon (T). |
|||
 |
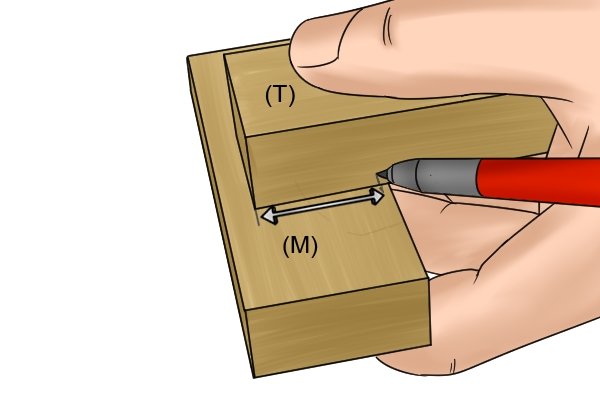
Step 2 – Align two piecesButt the tenon piece (T) against the mortise piece (M) where you want them to join. |
|||
 |
Step 3 – Mark tenon widthMark the width of the tenon piece on to the mortise piece. |
|||
 |
Step 4 – Mark shoulder lineNext, mark the shoulder line of the tenon. The shoulder line is where the tenon will stop against the mortise. Lay the tenon piece against the mortise piece and decide how deep you want the tenon to go into the mortice (this is typically over half of the full width of the mortise piece). Mark the shoulder line. |
|||
 |
Step 5 – Scribe shoulder lineUsing the initial mark, scribe the tenon’s shoulder line all the way around the tenon piece. Use a to scribe the line as this will ensure your line is level all the way round. If you don’t have a marking gauge then you’ll have to use a straight-edged tool (a ruler or try square), a pencil, and a steady hand. |
|||
 |
Step 6 – Mark tenon thicknessThe next step is to mark the tenon’s thickness. To keep the joint strong, the tenon’s thickness should be no smaller than 1/3 of the total thickness of the tenon piece. If you have a marking gauge then use this to scribe the lines all the way round the end of the stock, from shoulder line to shoulder line. If you don’t, use a pencil, a ruler and a steady hand. |
|||
 |
Step 7 – Mark cheek edgesNext, you should draw two lines parallel to each other over three faces of the tenon piece. These lines will mark the cheek edges. |
|||
 |
Step 8 – Mark out mortiseThe mortise is the slot that will eventually receive the tenon. The mortise and tenon should mate perfectly without any gaps. |
|||
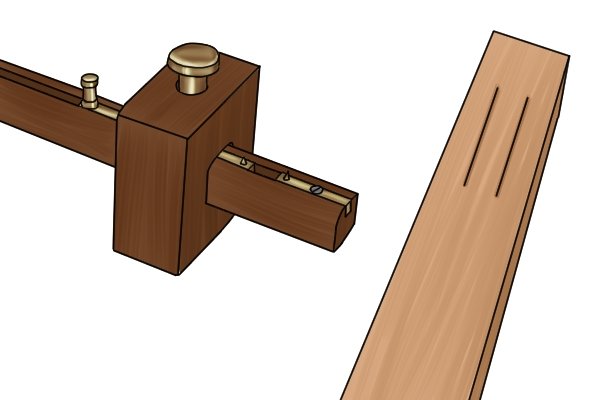 |
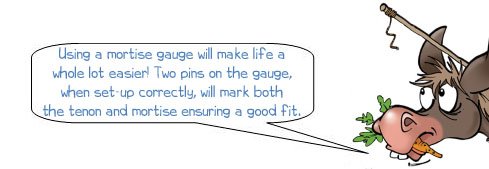
Step 9 – Use a mortise gaugeTo mark out the mortise lines, use a mortise gauge for accuracy. If you don’t have a mortise gauge or marking gauge then use a pencil, a ruler and a steady hand. |
|||
 |
Step 10 – Check markingsThe tenon should have a shoulder line around all four faces, and two lines over three faces sectioning the end of the stock into thirds. It should also have edge cheek lines. Check that the lines are as accurate as you can get them. The mortise slot should should match the thickness and shape of the tenon exactly, with no gaps. |
|||
 |
||||
Marking gauges |
||||
 |
Marking gaugeA marking gauge can be set to a specific depth along its sliding scale and then used to accurately score an indent on a workpiece (commonly timber) with its metal spur. Because the the depth is set, you can then easily transfer this measurement to another piece of material. These are particularly useful in woodworking and joinery tasks. |
|||
 |
Wheel marking gaugeAnother type of marking marking gauge has a small, circular scoring blade on top of its central shaft. The scoring blade can be set at a chosen distance from its base plate and used to score a line into a piece of timber. |
|||
 |
Mortise gaugeMortise gauges are similar to marking gauges insomuch as they are used to score a mark into a workpiece. Whereas a marking gauge has one metal scoring spur, a mortise gauge has two which can be adjusted within a screw-slide and set at a chosen width from each other. |
|||
 |
The mortise gauge’s spurs can be set at any distance from each other (within the limits of the screw-slide), though, for mortise joints, they are commonly set at the width of your mortise chisel blade. | |||
 |
Once the scoring spurs have been set, the mortise gauge can be pushed across the face of the material (usually wood) to score accurate parallel lines prior to cutting out the mortise. | |||
 |
Combination gaugeCombination gauges combine the abilities of both a marking gauge and a mortise gauge. |
|||
Cutting the mortise |
||||
 |
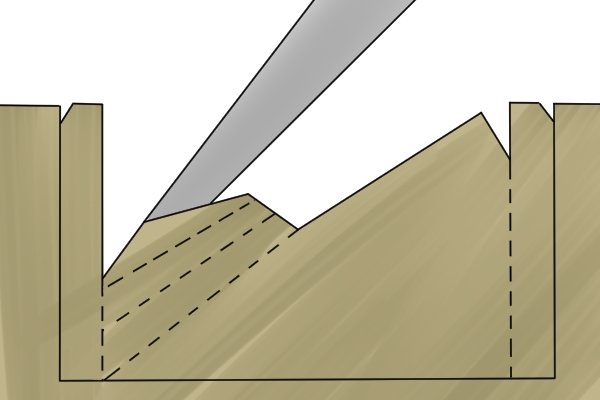
A mortise cut is essentially a recess or slot. This type of cut can be performed by striking your chisel with a mallet to cut downwards, then using a levering action to remove waste material. The only chisel you should use to make this kind of cut is a mortise chisel. | |||
 |
Step 1 – Indent edgesWith the flat back of the chisel facing the guideline, tap the chisel lightly with a mallet and make an indentation around the edge. |
|||
 |
Step 2 – Define edgesWith the flat back of the chisel still facing the guideline, make a larger indentation a few millimetres from the original mark. This will reduce the chance of you straying outside the marked area when cutting out the core of unwanted material. |
|||
 |
Step 3 – Sink chiselWith a firm mallet blow, sink the chisel into the centre of the material to be removed. |
|||
 |
Step 4 – Chop and leverUsing a chop and lever action, remove the unwanted material from the desired area. |
|||
 |
Note: the mortise chisel’s blade should be positioned with the bevel facing into the waste material. When the bevel faces in, the mortise’s edges are formed by the flat back of the blade, not the bevel, ensuring they are straight and true. | |||
 |
When the mortise chisel faces in the opposite direction (bevel facing out from the waste material) the chisel’s blade rides the bevel and makes a curved cut. You have less control over the chisel when cutting this way and you may risk straying into a piece of the timber you want to keep. | |||
 |
Step 5 – Remove unwanted materialKeep chopping away, breaking off, and levering out the unwanted material from the mortise slot. Leave the edges (or walls) of the slot until last. |
|||
 |
Step 6 – Finish mortise wallsOnce all the material has been removed from the mortise slot, turn the chisel blade around so that its bevel is facing towards the waste. Chisel down against the walls of your mortise and remove the last pieces of material. Because there is no longer any internal material, these pieces should easily be removed and you will be more likely to have a perfectly flat-walled mortise slot. |
|||
 |
Top tipMark how deep you would like your mortise to be by sticking a piece of tape around your mortise chisel. When the tape aligns with the surface of your timber, you know that you have reached your required depth. |
|||
Cutting the tenon |
||||
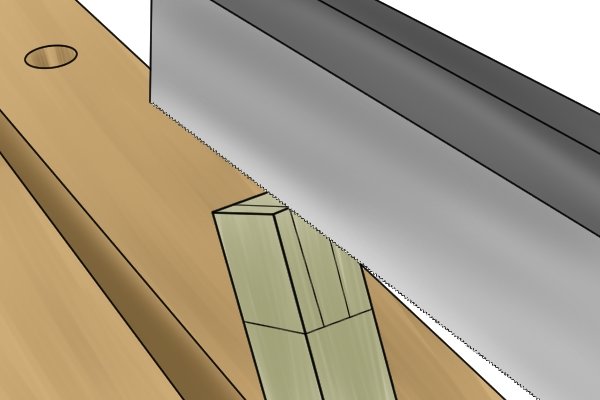 |
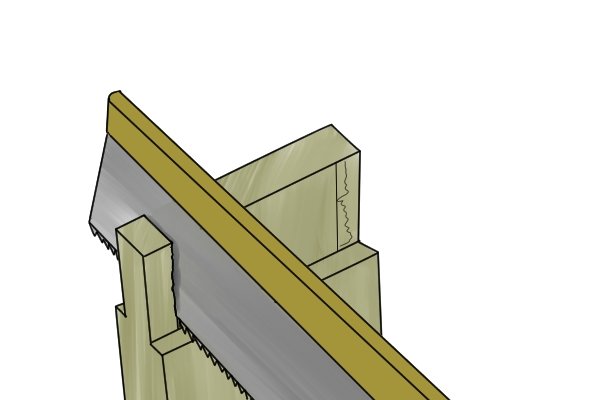
Step 1 – Saw tenon cheeksMake a small cut with your saw to help seat the blade and reduce the chance of it wandering. Begin sawing down following the guidelines you have marked out. The best saw to use for this job is a tenon saw. |
|||
 |
Step 2 – Saw down to shoulder lineSawing smoothly and keeping the saw blade straight, take the saw down to the shoulder line of the tenon. Do not go past the line or you will risk weakening your joint. Repeat this cut for the other side of the tenon. |
|||
 |
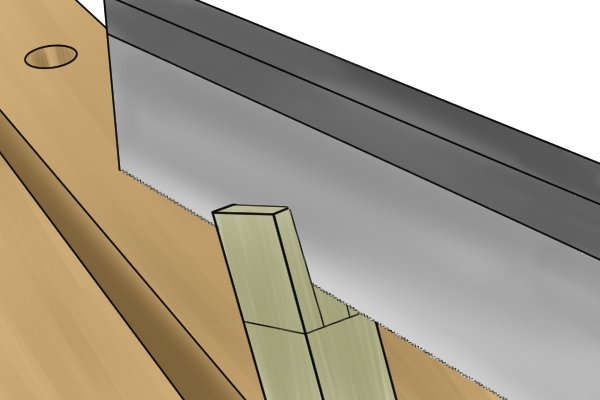
Step 3 – Saw across shoulder lineRemove the unwanted sides of the tenon by sawing along the shoulder line until you reach the tenon cheeks. Do this for both sides of the tenon. |
|||
 |
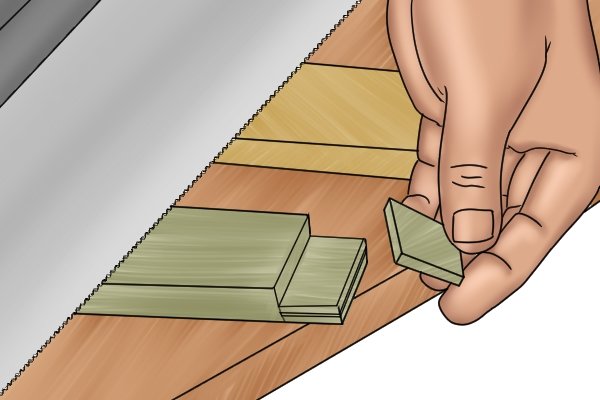
Step 4 – Pare down tenon cheeksIf your sawing is a little uneven, pare down the edges of the tenon until they are smooth and straight. Warning: do not pare the tenon so much that it becomes too small for the mortise or it will not fit properly. It is better for the tenon to be a little big and then trimmed to size rather than be too small. |
|||
 |
Step 5 – Mark sides of tenonThe next step is to mark a line either side of the tenon. This line should be the same thickness as your shoulder. |
|||
 |
Step 6 – Cut down cheek edgesOnce you have marked the sides of the tenon, use a tenon saw to cut first down and then across to take off the excess material. This should leave a shoulder of equal size all the way around the tenon. |
|||
 |
The finished mortise and tenon joint should slot together perfectly. Check to see if the tenon fits into the mortise. | |||
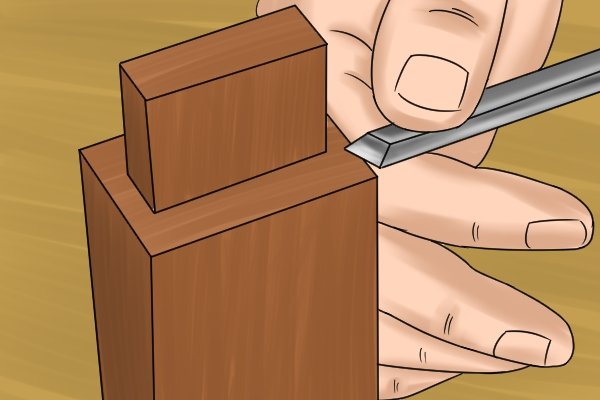 |
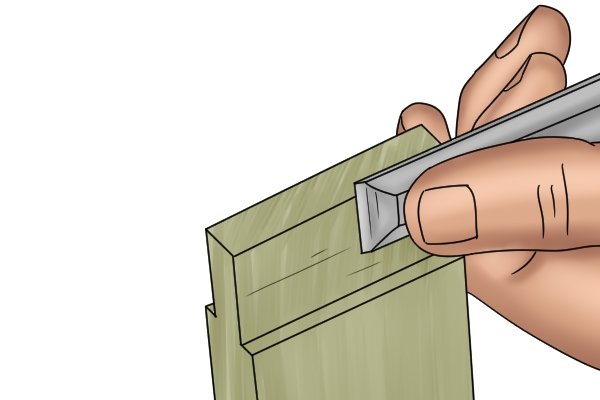
If the tenon does not fit, use a paring chisel (or suitable bench chisel) and pare it down a little until the tenon fits perfectly without any gaps. If, however, the tenon is too small then you will need to add a veneer or pack the mortise. | |||
Adding a veneer/packing the mortise |
||||
 |
If your tenon is too small for the mortise then you can quick-fix the problem by adding a veneer to the the tenon. A veneer is a thin piece of material which is affixed to the tenon to make it the correct thickness. | |||
 |
Once you have found a suitable veneer, glue it to the tenon and allow it to set. | |||
 |
If the veneer needs trimming to size then cut off any excess until it matches the shape of the tenon. If you cannot add a veneer to your tenon then you may be able to affix one inside the mortise. This is known as “packing the mortise”. | |||
