


How to use a metal anchor expansion tool?
How to use a metal anchor expansion tool |
||||
 |
Before you can use a metal anchor expansion tool you will need some metal hollow wall anchors that are suitable for your intended application and compatible with the metal anchor expansion tool you intend to use, along with a few other tools. | |||
How to select metal hollow wall anchors |
||||
 |
The hollow wall anchor you use must be suitable for the plasterboard thickness you have and capable of supporting the load required. Once you have selected the hollow wall anchor you will use then you can select a compatible metal anchor expansion tool. | |||
 |
Quality hollow wall anchors will display all this information on the pack so you can select the correct anchors for your application. | |||
Other tools you will need |
||||
 |
Along with your metal anchor expansion tool and hollow wall anchors you will need a drill with a suitable size of drill bit for your hollow wall anchors and a screwdriver that is compatible with the screw head of the anchors. | |||
How to determine the thickness of your plasterboard |
||||
 |
If your plasterboard has an insulation backing, the thickness you need to know is only that of the plasterboard and not the thickness including the insulation backing. | |||
 |
This is because as the collapsing legs of the hollow wall anchor fold back, they will squash and sink through the insulation backing before fixing on the back of the plasterboard. | |||
 |
You will need to do a little more work to determine the thickness of the plasterboard on an existing stud wall. In order to do this you will need the following tools: a drill and small drill bit, a piece of wire, electrical tape or similar, a stud finder or some strong magnets and a tape measure or ruler. | |||
 |
Step 1 – Find studsTo measure the plasterboard thickness you will have to avoid the sections of the wall where the studs are located. The easiest way to find the stud positions is to use a special stud finder tool. |
|||
 |
If you do not have a stud finder, another way of locating the stud positions within a wall is to use magnets. These will have to be strong magnets such as rare earth magnets: a good source of these is old computer hard drives. | |||
 |
Rub the magnet over the wall until you feel some resistance and the magnet sticks. It will do this once it is positioned over one of the screws that has been used to fix the plasterboard to the studs. Mark this position with a pencil and then run the magnet up and down to find the next screw and mark that position. | |||
 |
Alternatively, you can always use the old method of giving the wall a tap and listening for a hollow sound that will indicate there is no stud present behind the plasterboard. | |||
 |
Step 2 – Drill small holeOnce you know where the studs are in the wall, drill a small hole through the plasterboard, avoiding the studs. Try to do this on an area of the wall that is less visible, such as behind where you intend to place a picture. |
|||
 |
Step 3 – Bend wireTake a thin piece of wire such as a paper clip, and bend it so that it forms a straight line with a small 90 degree hook bent at the end. |
|||
 |
Step 4 – Push wire through holePush the piece of wire you have bent through the hole you have drilled in the wall. Then pull the wire back until the hook you formed at the end latches onto the back of the plasterboard. |
|||
 |
Step 5 – Mark wire lengthUsing some tape mark the position on the wire where it emerges from the hole. |
|||
 |
Step 6 – Remove wire and measureRemove the wire from the hole, being careful not to bend it as you do so. Using a ruler or tape measure, measure the distance from the hook at the end of the wire to the point marked by the tape. This distance is the thickness of the plasterboard on the stud wall. |
|||
How to fit a picture hook using a metal anchor expansion tool |
||||
 |
Step 1 – Decide on positionFirst make sure you have determined the thickness of your plasterboard and selected the appropriate size hollow wall anchors for your job. Then decide where you want to place the picture hook on the wall. |
|||
 |
Step 2 – Drill holeUsing the correct size drill bit for your hollow wall anchors (this should be clearly indicated on the pack) drill a hole where you want the picture hook to go. Be careful not to drill too far into the wall as there may be pipes of wires hidden within the wall cavity. |
|||
 |
Step 3 – Insert hollow wall anchorPush the hollow wall anchor into the hole you have drilled. |
|||
 |
Step 4 – Connect metal anchor expansion toolConnect the metal anchor expansion tool to the hollow wall anchor. To do this, you may have to back the screw out from the hollow wall anchor slightly with a screwdriver, so there is a slight gap between the screw head and flange of the anchor. |
|||
 |
The support surface of the metal anchor expansion tool should be pressed up against the flange of the hollow wall anchor and the plasterboard, while the back of the screw head should sit inside the U-shaped pulling arm. | |||
 |
Step 5 – Compress handles togetherCompress the handle of the metal anchor expansion tool together. If you are using a model with a ratchet mechanism, you may have to do this several times until you feel resistance from the hollow wall anchor, signifying it has set in place. |
|||
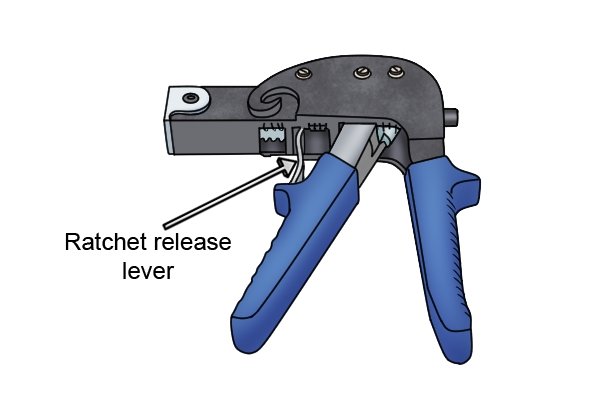 |
Once the hollow wall anchor is set you need to remove the metal anchor expansion tool. If the model you have used has a ratchet you will have to press the ratchet release lever or button to release the tension on the hollow wall anchor and screw in order to remove the tool. | |||
 |
Step 6 – Remove screwUsing a screwdriver, remove the screw from the hollow wall anchor. Place a washer followed by the picture hook on the screw and then replace it in the hollow wall anchor. Once you tighten the screw up you will be ready to hang your picture. |
|||
