Our other sites:

How To Fix Lead Flashing Into Masonry Joints?

How to Fix Lead Flashing into Masonry Joints?

How lead flashing is installed in masonry joints.

Lead flashing is vital to keep your property free from leaks and serious structural problems caused by damp getting into the premises. Anywhere that there is a break in the structure of the external of your building such as a chimney, skylights, windows or any other features it is best to use lead flashing to waterproof your property.

What to do before you fix lead flashing to masonry joints?

In this guide, we explain how to fix lead flashing into masonry joints using a lead strip and stainless steel clips. This guide does seem fairly straightforward; however, our advice at Wonkee Donkee is to leave lead flashing to professionals as any small breaks or damage to the flashing can result in expensive repairs needed.


You also need to ensure that you have the correct conditions to seal your lead flashing using this method. Trying to fix lead flashing to masonry joints is not always the most suitable option and you should assess the area you are working on first before you start any work.

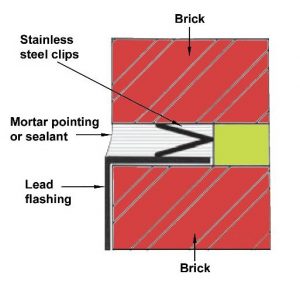
To begin, the depth of the masonry joint needs to be deep enough in order to secure the lead flashing. It is recommended that you have a minimum depth of 25mm, if your current brickwork does not have this then you may need to create chases to allow the lead flashing to be sealed in securely.


The process of preparing brickwork before fixing lead flashing is often referred to as cutting a chase or raking out. This is typically done with a mortar raking tool or an angle grinder, used to remove old mortar in order to create space for the lead flashing to be fixed in.

Unfortunately, removing mortar and installing chases is not always possible. In these cases, it is best to choose a different option in order to secure the flashing. Creating chases into the brickwork may not be suitable for several reasons including damage to the existing brickwork and thus the structure of the building or chimney. In addition, older brickwork on properties can become weaker in areas making them more vulnerable and are best not to be disturbed.

Guide to Fixing Lead Flashing into Masonry Joints

Lead flashing fixing clips are an efficient and effective way for roofers to install lead flashing into masonry joints and chases. The step-by-step guide below walks you through this process to successfully waterproof your roof or externally property features. 

Step 1 - Space your lead flashing in the correct position

Usually, the most time-consuming part of the task is correctly positioning the lead flashing in the correct position over the joint in the roof. Take your time when doing this and follow all of the regulations and standard rules to ensure that there are no weak areas in your joint.

Step 2 - Pull the lead flashing up to the chase or masonry joint

Ensure that you are ready to seal your work into place by pulling up your lead flashing (ensuring it is flush on all other surfaces) and into the masonry joint or chase.

Step 3 - Insert the steel clip with the ‘H’ side facing upwards

Slide the ‘H-clip’ into the chase/masonry joint on top of the lead flashing to secure it in place. Once it is in place, you can easily push it in further using a screwdriver or a similar tool in order to secure it.

Step 4 - Seal with lead pointing sealant

Once the steel clips are in place, seal the joint with lead pointing sealant. Take your time when doing this to ensure you get a clean finish.

Wonkee Donkee Tools
Logo