Our other sites:

How to install laminate flooring?

How to install laminate flooring?

What are the different types of laminate underfloor.

Laminate flooring is now a very popular flooring choice due to it being stylish, affordable and relatively easy to install. Although if you have never installed laminate flooring before you may not believe us on that last point – we promise it is not that hard! In this guide on how to install laminate flooring, we will walk you through everything you need to have and everything you need to do to successfully install a laminate floor in your home.

What to do before installing a laminate floor?

Unfortunately, before we start, there is a range of things that you need to consider to ensure that you can successfully install a great looking floor that will last a long time. The first thing is the type of subfloor that you are working on and getting appropriate underlay to sit beneath the laminate. You can read all about the different types of laminate underlay in our full guide.


Next, we need to make sure that you have all of the necessary tools in order to fully fit a laminate floor. To make it easy, we have come up with a list of all of the tools and materials you need to complete the job.


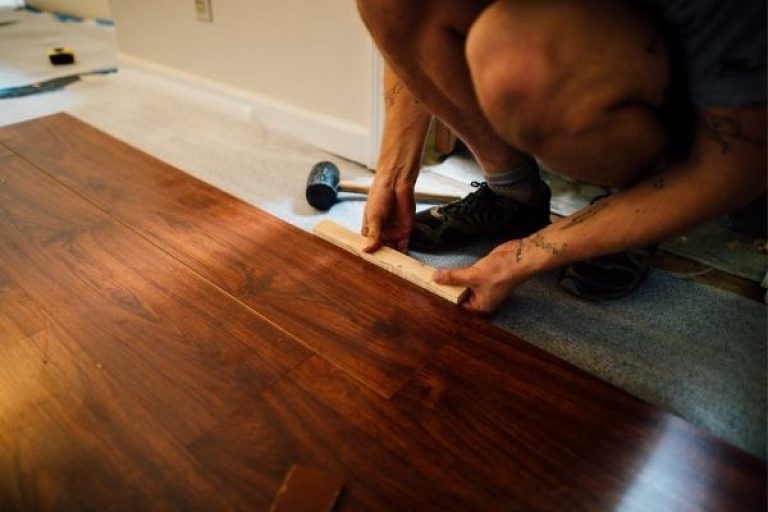
At this point, we are assuming that you have bought your laminate and it is all stacked up in the corner ready to go. Before you ever begin laying a laminate floor it is really important that you check all of the flooring pieces for any defects or damage. If there are any cracks or damaged edges to your pieces this could possibly lead to weak areas in your flooring and eventually a shorter lifespan. It is important to know that the majority of laminate flooring manufacturers will also not provide refunds or take returns of flooring that has been laid, so never begin installing flooring without thoroughly checking your materials first.

How to prepare an area for laminate flooring?

The majority of failed laminate flooring installations are due to the floor being laid in incorrect conditions. Below we address key issues as to why subfloors may lead to your laminate floor installation failing.

Moisture Levels

The first thing you must measure is the flatness of your properties subfloor. To lay down a laminate floor effectively there should be a maximum of 3mm difference in height within a 1-meter area in any direction. The easiest way to check for any imperfections in the flooring like these is to use a spirit level to confirm a smooth even surface. If your floor does slope or there are significant rises in certain areas then you will need to take steps to rectify this issue through using specialised products such as floor fillers.


Secondly, and less commonly done (but still important) is to test the subfloors moisture levels. To put it simply, you can use a tool called a hygrometer which provides detailed readings on the level of moisture on wooden surfaces and concrete moisture meters on concrete floors. The readings required for a surface to be ready for installing laminate flooring are:


Wooden Subfloor: between 45% and 65% Concrete Subfloor: 3%


These scales are only rough guides and some laminate flooring is designed to withstand higher moisture levels so always check the manufacturer’s guidance on the back of your laminate boards.

Clearing The Area

Before installing a laminate floor it is important that the area is thoroughly swept and cleared so that the surface is perfectly flat. In addition, you will also need to remove any of the previous flooring fixtures such as skirting boards or pieces of underlay in order to get the best results. One thing that you will need to consider at this point is the finish you want around the edges of your laminate floor.


It is important to know that laminate floors tend to expand once they have settled so you are required to leave an expansion gap around the edges of the room and use appropriate fittings between rooms or any obstacles within the floor. This is why skirting boards are less commonly used with laminate floors and beading is favored which helps cover the expansion gap whilst still allowing the laminate floor to expand.

How to install laminate flooring?

How to install laminate flooring with spacing.

The beauty of most laminate flooring is that it comes ready to go and is manufactured to contain slits that slide in to one and other. In addition, some newer laminate flooring may even click together when installing. This allows you to install the floor in sections, and our recommendation is to measure and loosely fit laminate flooring in blocks to ensure that they will effectively fit the floor space before you fully install.

Laminate floor installation spacing.

In order to prolong the life of laminate flooring you must leave at least a 10mm gap around the outside of the working area. As we described above this is important to allow the laminate boards to expand and contract which they will naturally do over time. If you fail to leave this space then the natural expansion of laminate flooring will cause the laminate floor to essentially buckle and cause rises in the floor.

Adapter plate for laminate flooring to walls.
Scotia for Laminate Flooring.

To cover the gaps after your installation there are a range of different wall spacer options available, coming in all different types of designs. Below are a few examples of different floor to wall spacing options available. 

Skirting Boards and Laminate Flooring.

You will also need to leave spacing between transition points within the floor. To do this, you will use transition points which are similar to the wall spacers but have different designs in order to account for whatever the flooring on the opposing side is required. For example, a doorway with laminate flooring in both rooms will need a translation joint in order to connect the two floors as seen in the picture. However, a laminate floor that leads to a room with a different flooring such as carpet or stone will use a different transition piece.

How expansion points work within laminate flooring.

Another key rule when installing laminate flooring is that you should not complete an area bigger than 8 meters without installing an expansion joint within the room. To cover spaces larger than 8 meters, you can install expansion joints within the flooring which allows the wood to expand naturally without causing the floor to buckle. Expansion joints are now so well designed that they can be extremely subtle and you may not even notice them within a large laminate flooring. To get the best finish when laminating large floors with laminate, taking time to ensure that the expansion points are in the right place and installed with care is vitally important.

Wonkee Donkee Tools
Logo