


How to plane wood using a bench hook?
How to plane wood using a bench hook |
||||
|
|
||||
 |
Bench hooks are useful for planing the end grain of workpieces and for planing along the grain of small pieces. | |||
Planing end grain |
||||
 |
After sawing through a piece of wood across its grain, you might want to use a hand plane to smooth the end grain that has been revealed by the cut. | |||
 |
A hand plane comprises a cutting edge – a sharpened metal plate – attached to a firm body which usually has front and rear handles. The cutting edge extends below the bottom surface, or sole, of the plane. | |||
 |
When moved backwards and forwards over a wood surface, the blade shaves off a very thin layer of wood on each forward pass, to slightly reduce the size of the workpiece and smooth out any unevenness in the surface of the wood. | |||
 |
Many hand planes are made of metal, usually steel, but there are also planes that have wooden bodies. | |||
 |
Because the workpiece is placed on the bench hook with its grain direction across the base, the hand plane has to be turned onto its side when planing the end grain. | |||
 |
If you have a bench hook with a hook that goes across the full width of the base, it is best to turn the bench hook around (reverse it) so that the stop is now used as the hook and vice versa. | |||
 |
With no offset, the hook will provide support for the workpiece right up to the edge of the base, with the side of the plane resting on the the workbench top. | |||
 |
A bench hook with a sub-base is ideally suited to planing the end grain of workpieces.
Instead of sliding the side of the plane on the top of the workbench, it can slide along the base of the bench hook, saving possible damage to the workbench top. A bench hook with a sub-base is normally not reversible. |
|||
 |
Step 1 – Position planePosition the plane’s sole against the edge of the working side of the base, or the edge of the sub-base if your bench hook has one. |
|||
 |
Step 2 – Position workpiecePlace the workpiece up against the bench hook’s stop, with the end grain to be smoothed against the sole of the plane. |
|||
 |
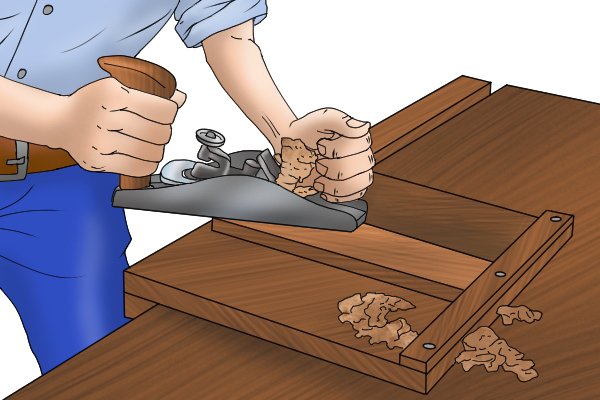
Step 3 – Begin planingWhile applying forward and sideways (into the sole of plane) pressure on the workpiece with your non-planing hand, move the plane backwards and forwards across the end grain of the workpiece, applying pressure so that it cuts the end grain on each forward pass. Fine layers of end grain are shaved off with each forward pass. |
|||
 |
Step 4 – Check smoothness and squarenessKeep checking progress until the end of the workpiece is smooth and square. It’s easy to damage wood when planing end grain: the wood is susceptible to what’s known as tear-out, or break-out, as the plane’s blade passes over the far edge of the workpiece. However, holding the workpiece hard against the stop will prevent this. |
|||
Planing along the grain |
||||
 |
A bench hook can be an effective stop – a device that stops a workpiece moving when pressure is applied in one direction – for planing along the grain of workpieces.
Reasons for planing along the grain include the need to smooth a rough surface, level a side of the workpiece, or reduce the thickness of the piece. |
|||
 |
Step 1 – Place workpiecePlace one end of the workpiece against the stop, so that the direction of the grain goes along the length of the bench hook, rather than across its width. |
|||
 |
Step 2 – Raise height of workpiece if necessaryIf the edge of the workpiece is lower than the stop, you will need to place a perfectly flat piece of waste wood (the light coloured piece of wood in this picture) underneath it so that the top edge of the workpiece is a little way above the stop. Without the scrap of wood, the leading edge of the plane will run into the stop. |
|||
 |
Step 3 – Begin planingWith both hands on the plane, move it forwards, while applying downwards pressure. As you move the plane forwards, the stop of the bench hook will prevent the workpiece from moving with it. |
|||
 |
Step 4 – Lift planeLift the plane slightly after completing the forward movement and reposition it for the next cutting stroke. Continue until the workpiece is smooth, even and the right size. |
|||
